Stage 7: Puzzle Room & Finish Line
Make sure you've finished Stage 6: Kinetic KillWall. This is the last building stage — after this, your obby is done!
a button puzzle, a finish line, and a fireworks party room
how sequences create game logic and how a finale rewards the player
a complete, finished obby ready to publish
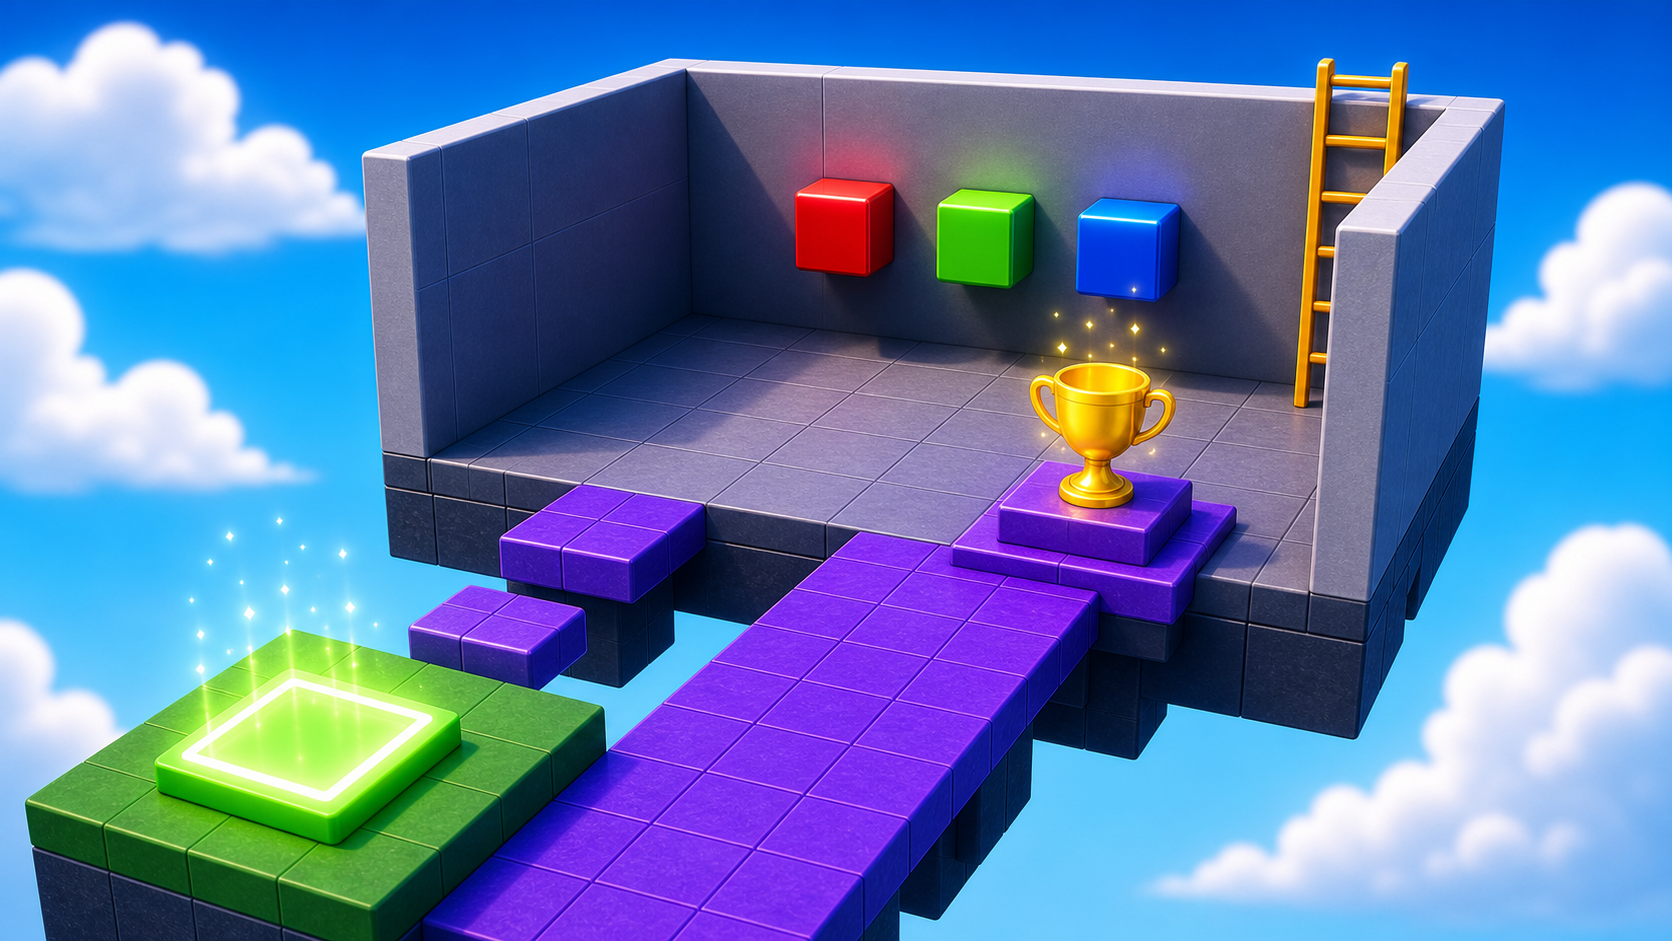
Preview the final button puzzle, fireworks finish, and celebration party room.
Build this stage belowThe big idea
For six stages every challenge has been reflex — jump, time, dodge, look. Today's finale is a puzzle: the player has to think. A wall blocks the exit until they press buttons in the right order. The lesson is clues and consequences: a puzzle without a clue is guessing, but a puzzle with a clue is solving.
Then you finish the obby for real — a finish line, fireworks, and a party room where players land and feel like winners. This is the last shot of your video, so make it count. By the end of today, your game is complete and ready to publish.
Build it
Step 1 — Build the puzzle room
A floor, two side walls, and a back wall the puzzle removes. The front is open so the player walks in from the Stage 10 checkpoint.

Build this partPuzzleFloor
BlockOpen recipe
PuzzleFloor
Block- Size
- 12 × 1 × 12
- Color
- Dark stone grey
- Material
- Concrete
- Anchored
- ✓ Yes
- Place
- Right in front of the Stage 10 checkpoint, stretching forward 12 studs
Build this partPuzzleWall_Left
BlockOpen recipe
PuzzleWall_Left
Block- Size
- 1 × 8 × 12
- Color
- Brick yellow
- Material
- Brick
- Anchored
- ✓ Yes
- Place
- Along the left edge of PuzzleFloor
Build this partPuzzleWall_Right
BlockOpen recipe
PuzzleWall_Right
Block- Size
- 1 × 8 × 12
- Color
- Brick yellow
- Material
- Brick
- Anchored
- ✓ Yes
- Place
- Along the right edge of PuzzleFloor (mirror of the left wall)
Build this partPuzzleWall_Back
BlockOpen recipe
PuzzleWall_Back
Block- Size
- 12 × 8 × 1
- Color
- Really red
- Material
- Neon
- Anchored
- ✓ Yes
- Place
- At the FAR end of the room (opposite the open front)
Solid red so players know 'this is the goal wall.' The script finds it by name — leave it named exactly `PuzzleWall_Back`.
Step 2 — Build the three buttons
Three colored buttons on the floor: Green, Red, Blue. Each is a flat cylinder.
Build this partButton_Green
CylinderOpen recipe
Button_Green
Cylinder- Size
- 1 × 2 × 2
- Color
- Lime green
- Material
- Neon
- Anchored
- ✓ Yes
- Place
- On PuzzleFloor, leftmost of three buttons
Cylinder with X = 1 looks like a flat disc — like a real arcade button.
Build this partButton_Red
CylinderOpen recipe
Button_Red
Cylinder- Size
- 1 × 2 × 2
- Color
- Really red
- Material
- Neon
- Anchored
- ✓ Yes
- Place
- On PuzzleFloor, middle of three buttons
Build this partButton_Blue
CylinderOpen recipe
Button_Blue
Cylinder- Size
- 1 × 2 × 2
- Color
- Bright blue
- Material
- Neon
- Anchored
- ✓ Yes
- Place
- On PuzzleFloor, rightmost of three buttons
Step 3 — Make each button clickable
A button can't be clicked unless it has a ClickDetector inside it. No script — just a built-in object.
- Right-click Button_Green → Insert Object → ClickDetector.
- Do the same for Button_Red and Button_Blue.
Step 4 — Add the script that runs the puzzle
The script lives in PuzzleWall_Back — the wall it eventually destroys. Right-click PuzzleWall_Back → Insert Object → Script. Delete the placeholder.
PuzzleWall_Back
The Script goes inside PuzzleWall_Back. The buttons MUST be named exactly Button_Green, Button_Red, and Button_Blue.
local wall = script.Parent

local greenButton = workspace:WaitForChild("Button_Green")
local redButton = workspace:WaitForChild("Button_Red")
local blueButton = workspace:WaitForChild("Button_Blue")

-- The correct sequence: press these in this order to win
local correctOrder = {"Green", "Red", "Blue"}
local currentIndex = 1

local function handleButton(buttonName)
  local expected = correctOrder[currentIndex]
  print(buttonName, "pressed. Expected:", expected)

  if buttonName == expected then
    currentIndex = currentIndex + 1
    if currentIndex > #correctOrder then
      print("PUZZLE SOLVED!")
      wall:Destroy()
    end
  else
    print("Wrong! Resetting sequence.")
    currentIndex = 1
  end
end

greenButton.ClickDetector.MouseClick:Connect(function()
  handleButton("Green")
end)

redButton.ClickDetector.MouseClick:Connect(function()
  handleButton("Red")
end)

blueButton.ClickDetector.MouseClick:Connect(function()
  handleButton("Blue")
end)
Press ▶ Play. Click Green, Red, Blue in that order — the back wall disappears. Wrong order resets the puzzle.
Change correctOrder = {"Green", "Red", "Blue"} to set a different answer. You can even repeat colors: {"Green", "Red", "Green"} is a whole new puzzle.
Step 5 — Write the clue on a side wall
Without a clue, the puzzle is a guessing game. On one side wall, place three small flat parts in the answer order — green first, red second, blue third — using the same colors as the buttons. Players who notice the wall get the answer.
- Green → 2. Red → 3. Blue
Step 6 — Add the finish-line checkpoint
This is the last checkpoint — it marks the end of the obby. Place it just past the back wall so it only appears after the puzzle is solved.
6.1 Add a SpawnLocation
Right-click Workspace → Insert Object → SpawnLocation.
6.2 Set its properties
- BrickColor → a celebration color! Gold, rainbow, whatever feels like a finish line.
- AllowTeamChangeOnTouch → checked. Neutral → unchecked. TeamColor → matches.
6.3 Tag it with its stage number
In Attributes, add a StageNumber attribute (number type) and set its value to 11. We use 11 for the finish pad so future scripts know "this is the win pad, past Stage 10."
6.4 Add a Team
Insert a Team named Finished, uncheck AutoAssignable, match its TeamColor, and place the SpawnLocation behind where the back wall stood.
Step 7 — Build the party room with fireworks
You're done with obstacles. Now build the celebration room behind the finish-line checkpoint — and give it the fireworks finale your video deserves.
7.1 Lay down the celebration floor
- In Workspace, click + → Part.
- Set Size to
[20, 1, 20], a bright BrickColor, and Material to Neon or Marble. - Set Anchored to checked.
- Rename it ExtensionPad.
- Drag it behind your finish-line SpawnLocation so a player who steps off lands on it.
The ExtensionPad name matters — every Roblox course in this series builds the same pad in the same spot, so the shape of your obby world stays familiar.
7.2 Add fireworks particles
Time for the grand finale — no code needed.
- Right-click ExtensionPad → Insert Object → ParticleEmitter.
- Click the ParticleEmitter and tune it in Properties for a celebration:
- Color — bright, rainbow, or your channel colors (it's a
ColorSequence). - Rate — high, like
80, for a steady shower. - Speed — higher so particles shoot up like fireworks.
- Lifetime — a second or two so they linger.
- Color — bright, rainbow, or your channel colors (it's a
- Add a second ParticleEmitter to a banner or sign for more sparkle. Search the Toolbox for firework or confetti textures.
Press ▶ Play and walk into the party room. Confetti! This is the last thing viewers see in your video — make it feel like winning.
Every great gameplay video ends on a high. The party room is that ending: the fireworks, the bright colors, the "I did it!" feeling. When you record in Stage 8, this is the shot you'll save for last.
Stage 7 clip target: In Stage 8, capture the puzzle solve and fireworks finish. This should be the final clip in your edited video unless another moment is even stronger.
Understand it
A puzzle is just a hazard that asks for thinking instead of reflex. The button sequence punishes a wrong action by resetting your progress, the same way a fireball punishes you by resetting your position. The clue is what turns guessing into solving — take it away (the hard stretch) and the same puzzle becomes brutal.
The script's currentIndex is the puzzle's memory — one number that tracks how far through the sequence the player is. A correct press advances it; a wrong press resets it. That "one variable that remembers where I am" pattern runs the save system in every real game. And wall:Destroy() is the simplest "win" in Roblox — it removes the wall so the player walks through.
The party room is the most important room in the obby. After seven stages of being challenged, the player needs to feel the win — bright colors, fireworks, open space. Without the celebration, the finish line is just one more pad. With it, you've got a closing shot worth posting.
Try this
Try this
Three short experiments. Predict before you run, then test your guess.
Hide the side-wall clue. Predict how long a brand-new player takes to solve the puzzle. Try it on a friend — were you close?
Change correctOrder to {"Red", "Red", "Red"} and compare to {"Green", "Red", "Blue"}. Which feels like a real puzzle? Why does repetition feel cheaper than a sequence?
Look back across all seven building stages. Which one will be the highlight of your video — the one you put in the thumbnail? Knowing your best moment is half of being a creator.
Test your finished obby
Before you call the build done:
- Press ▶ Play and start from the very beginning.
- Check that every checkpoint sends you to the correct stage.
- Solve the puzzle without using the editor.
- Walk into the party room and confirm the fireworks fire.
- Ask a Code Coach for one final full playthrough.
- Design check. Does the difficulty climb smoothly from Stage 1 to the finale, with no sudden spikes?
If it breaks
- Clicking does nothing. A ClickDetector is missing from the button — expand the button in Explorer and add one if needed.
- Output shows
WaitForChild "Button_Green" never finished. A button is misnamed. They must be exactlyButton_Green,Button_Red,Button_Blue. - The wall disappears on the first press. Your
correctOrderis probably a one-item list. Make sure it has all three colors. - My finish SpawnLocation isn't visible when I solve it. It's behind the wall — drag it slightly past where the wall stood.
- The fireworks don't show. The ParticleEmitter must be inside a part, with Rate above
0. - The party room feels boring. That's a content problem, not code — add banners, a "YOU DID IT" sign, and more confetti from the Toolbox.
Save your finished game
You just built a complete game world. Save it — File → Save to File As → name it MyObby.rbxl somewhere you'll find it.
Next up: the Studio half of the course. In Stage 8 you'll publish this game so other kids can play it, and record the action. Then you'll edit it (Stage 9) and post it (Stage 10). The building is done — now you become the YouTuber.