Stage 3: Choose-Your-Path Bridge
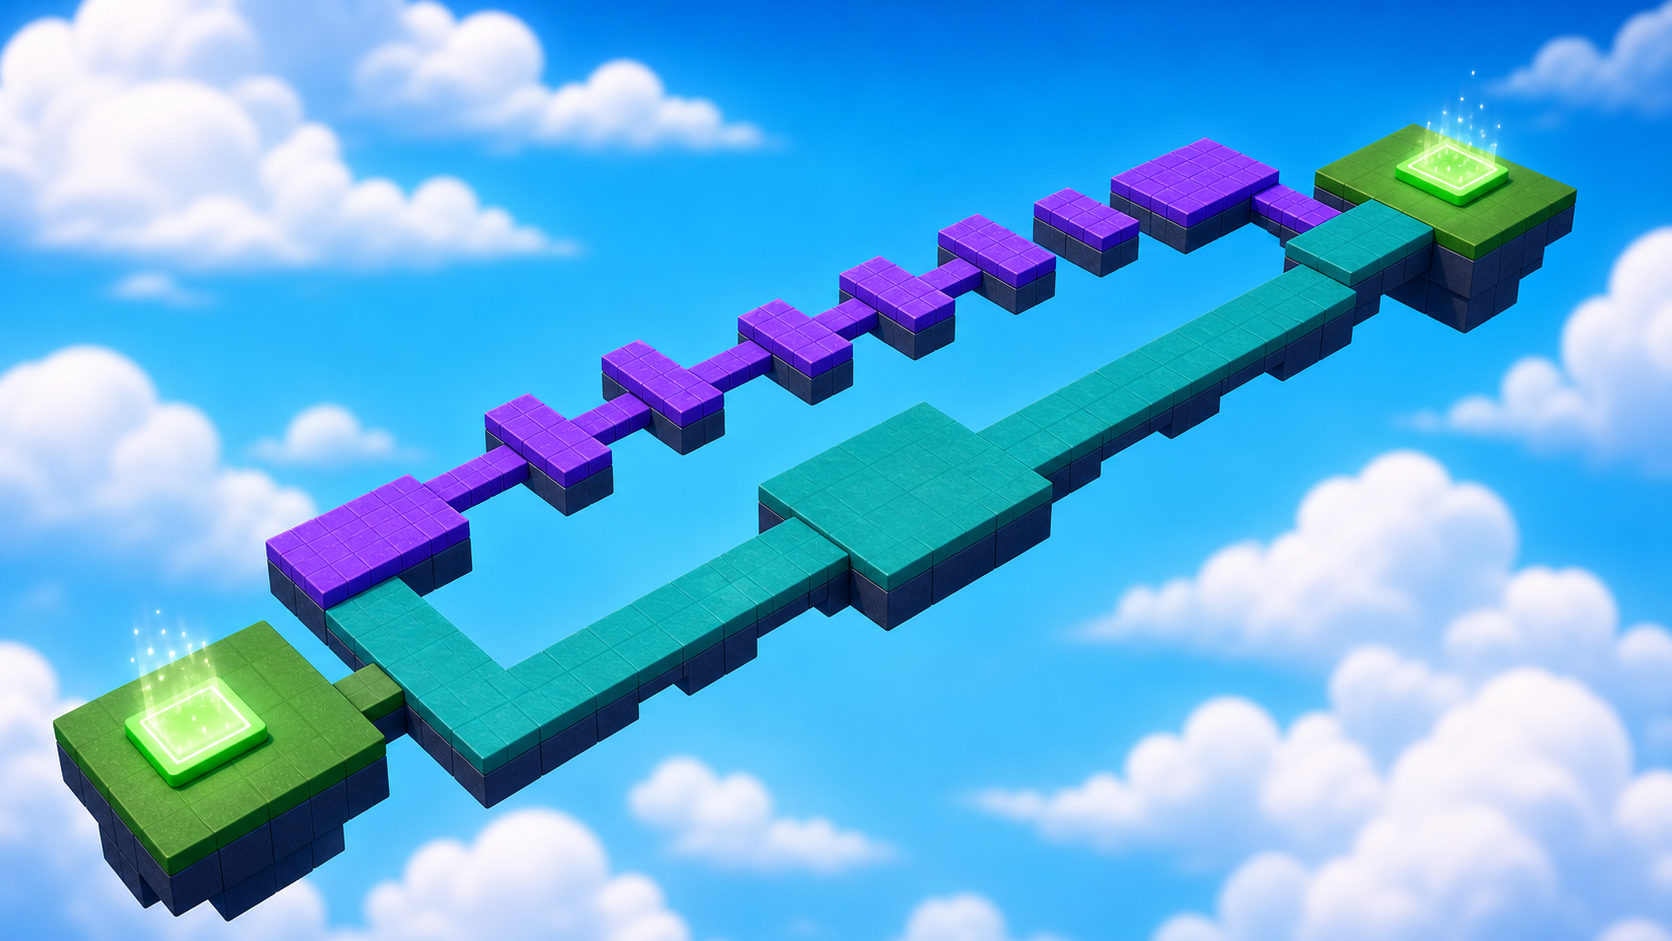
Your shape path is tuned, fair, and saved at Checkpoint_03. So far your players have had one job: forward. Ahead, the course splits over open sky — and for the first time, they get to decide.
Narration transcript
- Stage Two shipped a tuned three-shape path and saved it at Checkpoint zero three. Keep that tested checkpoint open. Stage Three begins there.
- Build two routes to one goal, learn decomposition and repetition, and ship a choice where neither path is simply better.
- Spoken bridge: Mission ready. First, understand the idea that makes this stage work.
two routes to one goal — the calm way and the gamble
how decomposition and repetition organize a larger build
a choice where neither path is simply better
Idea
Narration transcript
- Big builds stop being scary when you decompose them: break one bridge into small tasks and finish them one at a time. Repetition finishes the risky route fast — build one plank, tune its jump, then duplicate it. Your players feel all of that as one thing: a real choice between the calm way and the gamble.
- Spoken bridge: Turn that idea into three small Logic Cards.
Decomposition means splitting a big job into smaller jobs. "Build a bridge" is vague. "Build the safe lane, then the shortcut, then join them" is a plan you can finish one piece at a time. Repetition finishes the shortcut fast: build one plank, tune its jump until it's fair, then duplicate it — every copy inherits the fairness.
Your players feel all of that as one thing: a real choice. The wide route is longer and calm. The narrow shortcut is faster and risky. Good games make the player weigh it.
Logic Board
Finish these cards from left to right. Each card becomes a Code Quest below.
- 1Card A
Narration transcript
- Build the safe route — the long, calm way across.
- A careful player crosses it without a single jump.
Build the safe route
Build the long, calm way across.
Done when: A careful player crosses it without a single jump. - 2Card B
Narration transcript
- Tune one risky plank, then repeat it into a shortcut.
- The shortcut works and a clean run is faster.
Build the shortcut
Tune one risky plank, then repeat it.
Done when: The shortcut works and a clean run is faster. - 3Card C
Narration transcript
- Rejoin both routes and save Checkpoint zero four.
- Both choices reach the same saved goal.
- Spoken bridge: The plan is complete. Pick your Build Mode on the page and build one card at a time — pause after every Studio action.
Join the routes
Rejoin both lanes and save the checkpoint.
Done when: Both choices reach the same saved goal.
Build
Pick your Build Mode, check the wiring card, then work the three quests in Build the Routes below. Any bridge that offers a real choice counts — the designer check at the end proves yours works.
Every builder plays this stage in their own mode. Which sounds like you?
Not sure? Start with Guided — you can level up on any stage, and your pick follows you through the whole course.
Names that must match
Build inside Workspace → Course → Stage03, from Checkpoint_03 to Checkpoint_04. No scripts yet — these names keep your Explorer readable, and future stages will find your pieces by name. Everything else about each object is your call.
SafePlank_1Part of the safe route's continuous surface.SafePlank_2Part of the safe route's continuous surface.RestPlatformA rest stop in the middle of the safe route.SafePlank_3Part of the safe route's continuous surface.SafePlank_4Part of the safe route's continuous surface.RiskPlank_1–7The risky route's narrow planks with real gaps between them.Landing_04The one landing where both routes rejoin — Checkpoint_04 stands here.
Reference buildStuck, or just want to copy ours? Here is exactly how we built this stage.
These values always work together. Copy them as-is, or borrow a few and keep the rest of the stage yours.
Build this partSafePlank_1
Part · BlockOpen recipe
SafePlank_1
Part · Block- Size
- 14 × 1 × 10
- Anchored
- ✓ Yes
- Orientation
- 0 × 0 × 0
- CanCollide
- ✓ Yes
- Place
- Position [-13, 3.5, 98] inside Workspace → Course → Stage03
Build this partSafePlank_2
Part · BlockOpen recipe
SafePlank_2
Part · Block- Size
- 10 × 1 × 14
- Anchored
- ✓ Yes
- Orientation
- 0 × 0 × 0
- CanCollide
- ✓ Yes
- Place
- Position [-19, 3.5, 110] inside Workspace → Course → Stage03
Build this partRestPlatform
Part · BlockOpen recipe
RestPlatform
Part · Block- Size
- 12 × 1 × 12
- Anchored
- ✓ Yes
- Orientation
- 0 × 0 × 0
- CanCollide
- ✓ Yes
- Place
- Position [-19, 3.5, 123] inside Workspace → Course → Stage03
Build this partSafePlank_3
Part · BlockOpen recipe
SafePlank_3
Part · Block- Size
- 10 × 1 × 44
- Anchored
- ✓ Yes
- Orientation
- 0 × 0 × 0
- CanCollide
- ✓ Yes
- Place
- Position [-19, 3.5, 151] inside Workspace → Course → Stage03
Build this partSafePlank_4
Part · BlockOpen recipe
SafePlank_4
Part · Block- Size
- 14 × 1 × 10
- Anchored
- ✓ Yes
- Orientation
- 0 × 0 × 0
- CanCollide
- ✓ Yes
- Place
- Position [-13, 3.5, 178] inside Workspace → Course → Stage03
Build this partRiskPlank_1–7
7 Parts · BlockOpen recipe
RiskPlank_1–7
7 Parts · Block- Size
- 3 × 1 × 6
- Anchored
- ✓ Yes
- Orientation
- 0 × 0 × 0
- CanCollide
- ✓ Yes
- Place
- 1: [7, 3.5, 110] · 2: [7, 3.5, 119] · 3: [7, 3.5, 128] · 4: [7, 3.5, 137] · 5: [7, 3.5, 146] · 6: [7, 3.5, 155] · 7: [7, 3.5, 164] inside Workspace → Course → Stage03
Build this partLanding_04
Part · BlockOpen recipe
Landing_04
Part · Block- Size
- 20 × 1 × 16
- Anchored
- ✓ Yes
- Orientation
- 0 × 0 × 0
- CanCollide
- ✓ Yes
- Place
- Position [0, 3.5, 180] inside Workspace → Course → Stage03
Build the Routes
Build the safe route
Narration transcript
- Build your safe route inside Stage zero three: a continuous walkable lane with a rest platform along the way. Your track shows the map or the brief — either way, jump-free means jump-free.
- Spoken bridge: Card A now matches its success check. Continue to Card B.
A — The calm way. Build your safe route inside Stage03: a continuous walkable lane with a rest platform along the way. Your track shows the map or the brief — either way, jump-free means jump-free. Cross it once in Play mode.
Tune one plank, then repeat it
Narration transcript
- Repetition reuses one tuned piece. Build one narrow plank, make its jump fair by playtesting, then duplicate it along the shortcut so every jump feels the same.
- Build one risky plank, tune its gap, then duplicate it into a full shortcut beside the safe route. Time both routes in Play mode.
- Spoken bridge: The behavior passed its focused test. Finish the checkpoint handoff.
Repetition reuses one tuned piece. Get a single plank's jump feeling fair first — then every duplicate inherits that fairness for free.
B — The gamble. Build one risky plank, tune its gap by playtesting, then duplicate it into a full shortcut beside the safe route. Time both routes in Play mode — a clean risky run should win.
Join and save
Narration transcript
- Rejoin both routes at one landing, add Landing zero four, and complete the Checkpoint zero four recipe. Touch it and reset.
- Spoken bridge: The next checkpoint saved. One designer check before you style it: does your stage pass?
C — One goal. Rejoin both routes at one wide landing: add an anchored Landing_04 where the lanes meet (reference: [20, 1, 16]), then complete the checkpoint recipe. Touch it and reset.
Checkpoint recipeSave progress at Stage 4
Using the voice guide? It reads one recipe step, waits while you work, then continues when you choose Done — hear next step.
- Insert one SpawnLocation in Workspace and rename it
Checkpoint_04. Set Size to about[6, 1, 6]and Anchored totrue. Centered on the landing that ends Stage 3, with its top just above the landing surface. (Our reference build puts it at Position[0, 4.5, 180].) - Set Neutral to
false, Enabled totrue, and AllowTeamChangeOnTouch totrue. - Set the SpawnLocation TeamColor to
Bright orange. Set its visual BrickColor to the same named color. TeamColor controls respawning; BrickColor only controls what the pad looks like. - Point at Teams in Explorer, select its +, and insert one Team named
Stage 4. Set its TeamColor toBright orangeand AutoAssignable tofalse. Never reuse this TeamColor on another checkpoint. - Press Play. Climb to and touch
Checkpoint_04, then reset your character and confirm you respawn there. Press Stop before editing again.
Workspace → Checkpoint_04Teams → Stage 4 (Bright orange)Does It Pass?
Narration transcript
- Time for the designer check. Play your bridge and walk the pass list: two routes a player can tell apart, a jump-free safe lane, a gamble that pays when it works, and one landing that saves it all. A rule that fails is just the next thing to tune.
- Spoken bridge: Your stage passes — it is a real level now. Time to make it feel like your game.
Does your stage pass?
Play your stage and check each one. A rule that fails isn't a mistake — it's just the next thing to tune.
- Nothing moves, falls, or drifts — every part stays exactly where you put it.Check: Press Play — everything stays put.Tip: Anchored on for every part, and CanCollide on for anything players stand on.
- Your stage offers a real choice — two routes leave the checkpoint and rejoin at one landing.Check: Walk each route to the same landing.
- The safe route is the long, calm way around — crossable without a single jump.Check: Cross the safe route jump-free.Tip: A continuous walkable surface: planks touching or overlapping, no gaps.
- The risky route is the gamble — real jumps, but faster when you don't fall.Check: Time both routes — a clean risky run wins.Tip: At least 5 aimed jumps on a genuinely shorter path keeps the gamble honest.
- A player can tell the two routes apart before choosing.Check: Stand at the checkpoint: the choice is obvious at a glance.Tip: Width, color, or a signpost all work.
Make It Yours
Narration transcript
- Signpost the choice in your world's language. What do safe and risky look like where your game lives — rope bridge and crumbling stones, rainbow road and licorice planks? Make the gamble readable in theme.
- Spoken bridge: That is your stamp on the stage. Now explain what made it work.
Signpost the choice in the language of your world. What do safe and risky look like there — a rope bridge beside crumbling stones? A rainbow road beside licorice planks? Recolor each route so a player can guess which one is the gamble without reading a word.
Help Ladder
Stuck? Choose what went wrong
Pick the problem that matches. Open one clue, try it, then return only if you still need help.
My parts overlap or miss the next checkpoint
Clue 1: small hint
Narration transcript
- Stop Play mode and check one part against the stage rules before touching anything else.
Clue 2: where to look
Narration transcript
- Check Workspace, Course, Stage zero 3, and keep both checkpoints directly inside Workspace.
Workspace → Course → Stage03. Find Checkpoint_03 and Checkpoint_04 directly inside Workspace.Clue 3: worked answer
Narration transcript
- Walk your stage rules top to bottom and fix the first rule that fails. If you want a layout that always works, open the reference build and copy its values.
Checkpoint_03.my bridge pieces do not line up
Clue 1: small hint
Narration transcript
- Fix one plank, then rebuild from that known-good part.
Clue 2: where to look
Narration transcript
- Compare Size and Position in Properties, and use duplicate instead of unrelated new parts.
Clue 3: worked answer
Narration transcript
- Delete only the bad copies, keep the first correct plank, duplicate it again, and move each copy by the same distance. Then test each route separately from Checkpoint zero three.
Learn What Happened
Narration transcript
- You decomposed one big bridge into small tasks and used repetition to finish the shortcut fast. Programmers do exactly this: break the problem down, perfect one piece, then reuse it everywhere.
- Spoken bridge: Use one small prediction to transfer that idea.
You decomposed one big bridge into small tasks and used repetition to finish the shortcut fast — make a correct pattern once, then reuse it. Programmers do exactly this: break the problem down, perfect one piece, reuse it everywhere. And your players never see the method; they just feel a fair choice.
Try This
Narration transcript
- Predict which route a first-time player will choose. Compare by timing both routes, and connect the result to width, spacing, and repetition.
- Spoken bridge: Finish with four proof checks. Each check must match something you can observe or explain.
Try this
Three short thinking checks. Use evidence from the stage you just built.
Prove It
Narration transcript
- Spoken bridge: Final proof. Confirm one result at a time.
- Your stage offers two readable routes — safe and risky — that rejoin at one landing.
- Both routes work and the risky shortcut is faster.
- Checkpoint_04 saves progress and reset returns you there.
- You can explain decomposition and repetition in this build.
Narration transcript
- Stage Three complete. You shipped a real choice and earned one hundred XP. Stage Four is the big one: your world starts fighting back, because you are about to write your first Lua.