Stage 1: First Checkpoint
Setup gave you Lobby, Checkpoint_01, and an empty Course folder — a world with nothing in it yet. Keep that file open. Stage 1 is your first climb — a climb you design — and the first moment your game remembers a player.
Narration transcript
- Spoken bridge: Welcome to Stage One. This is where your world becomes a game.
- Setup gave you Lobby, Checkpoint zero one, and an empty Course folder. Keep that file open. Stage One is your first climb — a climb you design — and the first moment your game remembers a player.
- Your mission is to design your own first climb between two checkpoints, learn how a start, a challenge, and a goal make one playable stage, and ship a stage that saves the player's progress.
your own first climb between two checkpoints
how start, challenge, and goal form one playable stage
a stage that saves the player's progress
Idea
Narration transcript
- Spoken bridge: Let's start with the shape of a playable level.
- A playable level needs a start, a challenge, and a goal. In an obby, a checkpoint is both the goal for one stage and the start of the next.
- Roblox can respawn a player at the latest Spawn Location when its color matches a Team. Today, your code is a set of matching object names and colors. Real code, because code is any precise instruction the computer can follow.
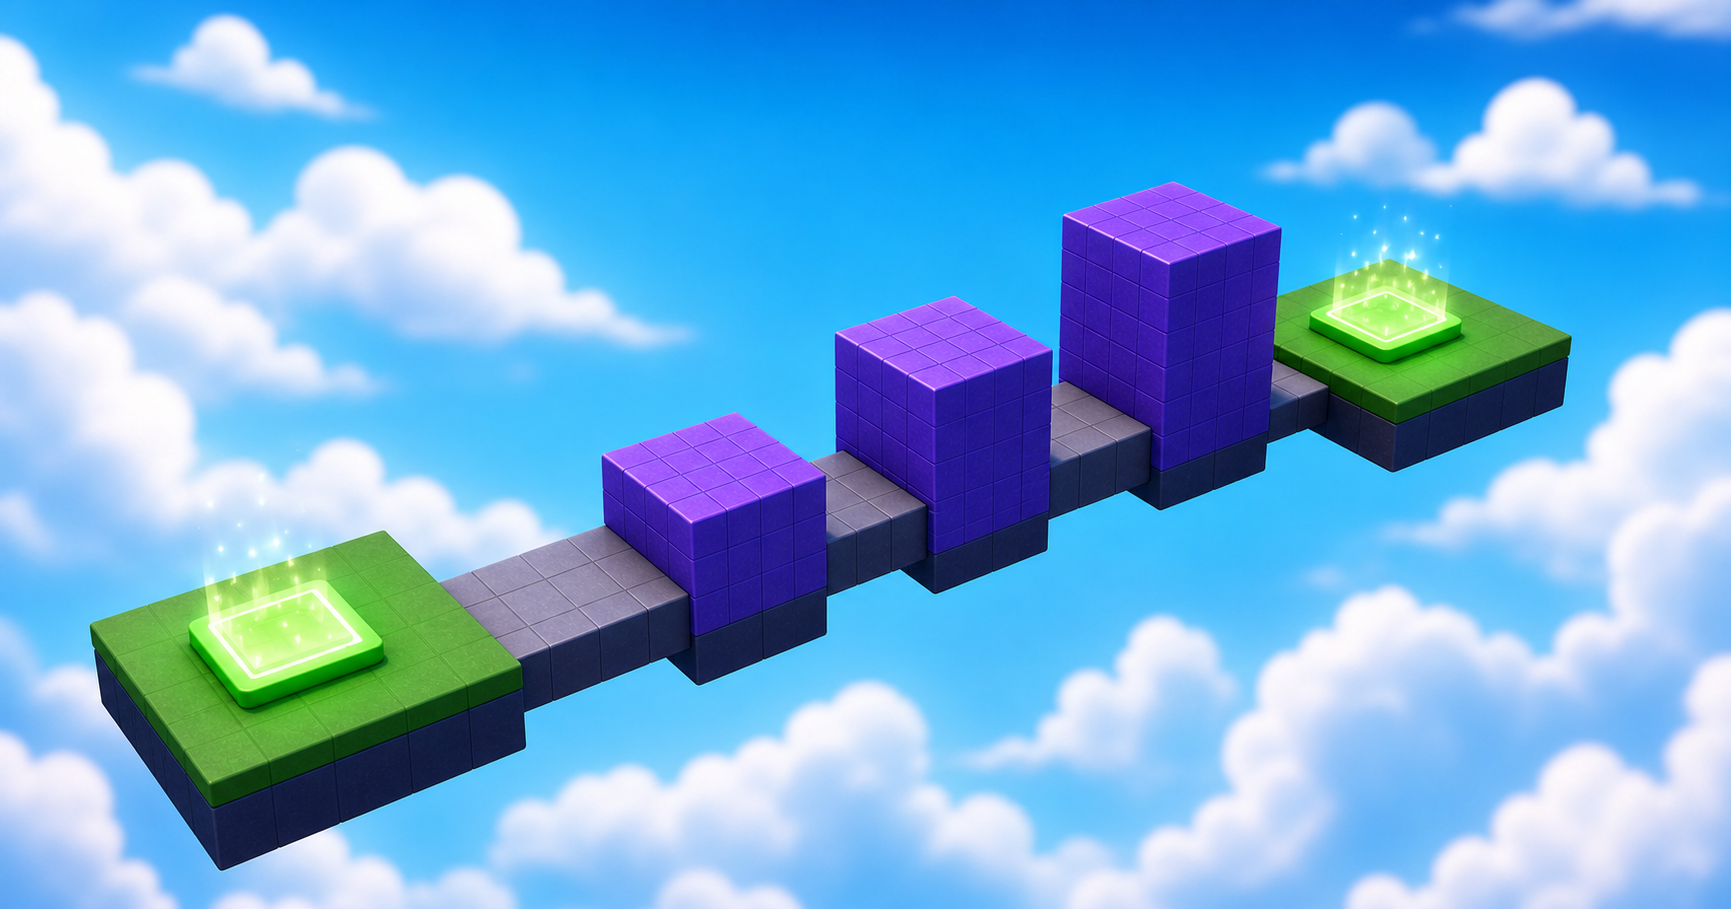
- The sample picture shows one way Stage One can look: three rising steps between two checkpoints. Yours can look completely different. What matters is the climb.
- Spoken bridge: Time to design. Pick your Build Mode on the page, and let's wire up the start.
A playable level needs a start, a challenge, and a goal. In an obby, a checkpoint is both a goal for one stage and the start of the next.
Roblox can respawn a player at the latest SpawnLocation when its color matches a Team. Today your code is a set of matching object names and colors — real code, because code is any precise instruction the computer can follow.
Build
Narration transcript
- First, the start. Stage One is the only Team with Auto Assignable on, because every new player must begin here.
- In Explorer, open Workspace, then Course. Add a Folder named Stage zero one. Every Stage One part you build will live inside it.
- Look for the Teams service in Explorer. If it is hidden, right-click inside Explorer, choose Show Services, select Teams, and choose Insert.
- Select Checkpoint underscore zero one from Setup. Confirm it is anchored and sits on the Lobby, a few studs toward where your first stage will grow.
- Set Neutral to false, Enabled to true, and Allow Team Change On Touch to true.
- Set the Spawn Location Team Color to Bright blue. Set its visual Brick Color to the same named color. Team Color controls respawning. Brick Color only controls how the pad looks.
- Point at Teams in Explorer, select its plus, and insert one Team named Stage One. Set its Team Color to Bright blue and Auto Assignable to true. Never reuse this Team Color on another checkpoint.
- Press Play. Confirm your character starts on Checkpoint underscore zero one. Then reset your character and confirm you respawn there. Press Stop before editing again.
- Explorer check: Workspace contains Checkpoint zero one. Teams contains Stage One with Bright blue Team Color.
- Spoken bridge: Great work. Your start checkpoint passed its playtest, so every new player has the right place to begin. Now the fun part: design the climb.
First, the start. Stage 1 is the only Team with AutoAssignable on, because every new player must begin here.
In Explorer, open Workspace → Course. Insert a Folder named Stage01. Every Stage 1 platform you build lives inside it. (Checkpoints are special — they stay directly inside Workspace.)
Checkpoint recipeSave progress at Stage 1
Using the voice guide? It reads one recipe step, waits while you work, then continues when you choose Done — hear next step.
- In Explorer, make sure the game has a Teams service. If it is hidden, right-click inside Explorer, choose Show Services…, select Teams, and choose Insert.
- Select the Checkpoint_01 you built in Setup and confirm it is named
Checkpoint_01. Set Size to about[6, 1, 6]and Anchored totrue. On the Lobby, a few studs toward Stage 1, so new players spawn facing your first challenge. (Our reference build puts it at Position[0, 1, 10].) - Set Neutral to
false, Enabled totrue, and AllowTeamChangeOnTouch totrue. - Set the SpawnLocation TeamColor to
Bright blue. Set its visual BrickColor to the same named color. TeamColor controls respawning; BrickColor only controls what the pad looks like. - Point at Teams in Explorer, select its +, and insert one Team named
Stage 1. Set its TeamColor toBright blueand AutoAssignable totrue. Never reuse this TeamColor on another checkpoint. - Press Play. Confirm your character starts on
Checkpoint_01, then reset your character and confirm you respawn there. Press Stop before editing again.
Workspace → Checkpoint_01Teams → Stage 1 (Bright blue)Can't find a Studio control? See the real Studio steps
These are authentic screenshots from the Stage 1 project. Open only the guide for the step where you are stuck.
Show Teams, then insert a Team
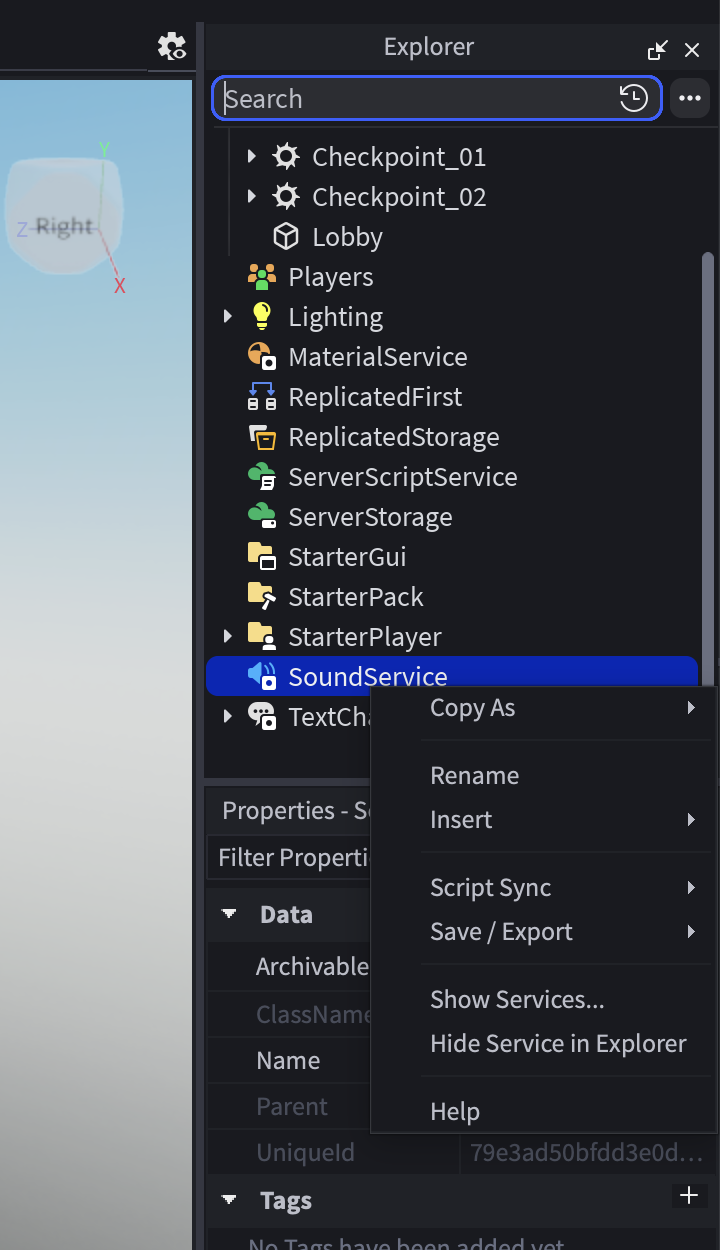
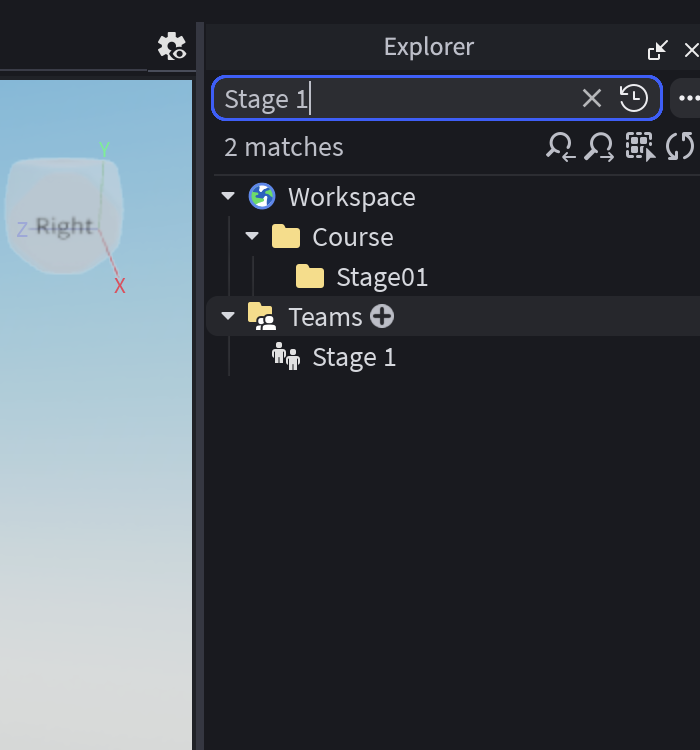
Teams is a game service, so reveal it from Show Services if it is hidden. A Team is an object inside that service, so add it with the plus beside Teams.
- Reveal the Teams service — Show Services: Right-click inside Explorer and choose Show Services. Select Teams in the window, then choose Insert.
- Add the Stage 1 Team — Plus beside Teams: Point at Teams, select its plus, and choose Team from the object list.
- Add the Stage 1 Team — Team result: The new Team appears one level inside the Teams service.
Select first, then check properties
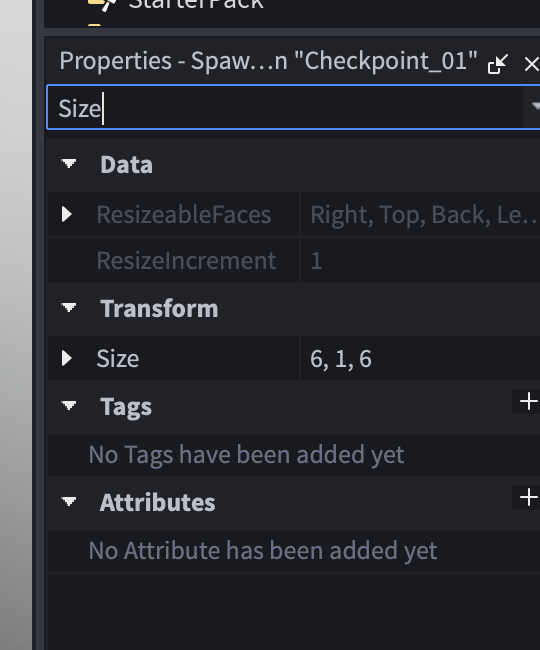
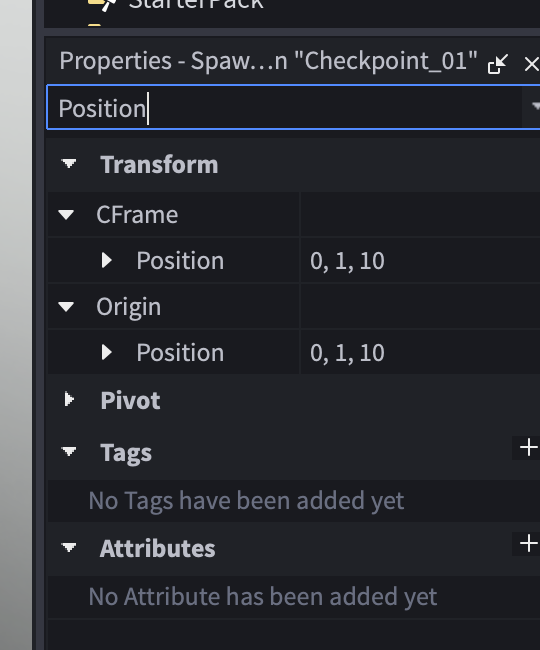
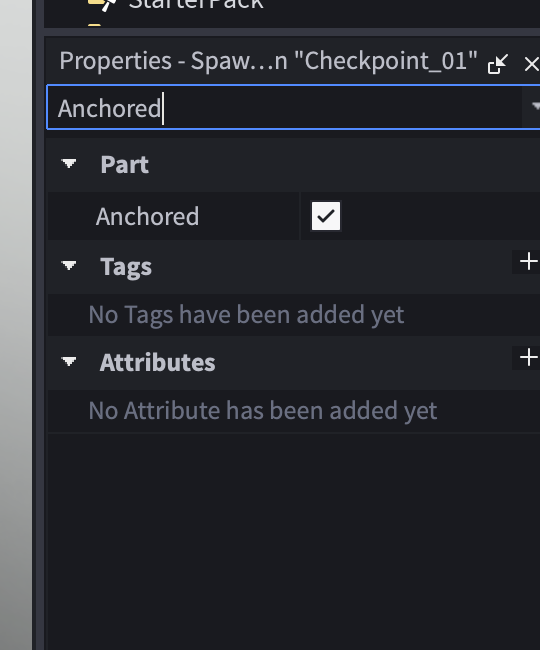
The Properties heading names the object you are editing. Check it before changing any value, then enter vectors in X, Y, Z order.
- Size: Vectors are three numbers in X, Y, Z order — a checkpoint pad around 6, 1, 6 works well.
- Position: Typing a Position here places the part precisely — useful whenever a rule says "on the Lobby" or "on your landing."
- Anchored: Turn this on so the checkpoint does not fall.
Match the two TeamColor values
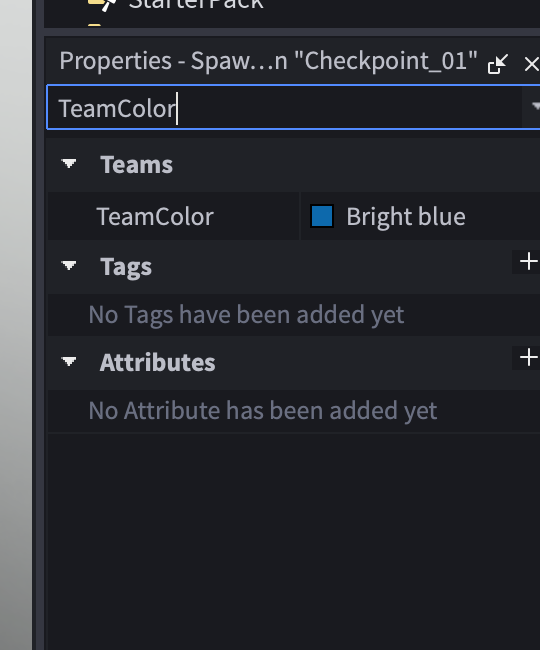
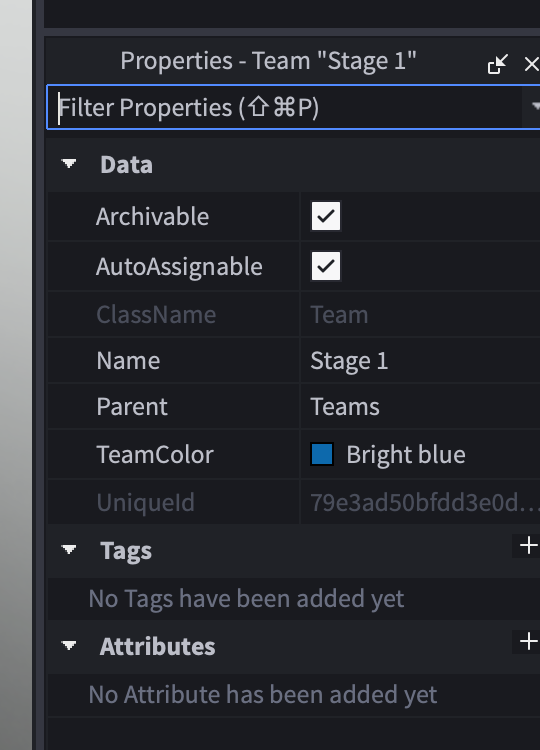
The SpawnLocation and its Team connect because their TeamColor names match. BrickColor only changes appearance.
- Checkpoint_01 — Checkpoint TeamColor: Bright blue controls which Team owns this respawn pad.
- Stage 1 Team — Team TeamColor: Use the same Bright blue name as the checkpoint.
- Stage 1 Team — AutoAssignable: On for Stage 1 only; off for later stages.
Narration transcript
- Now the fun part: design the climb. Pick your Build Mode on the page and build at least three platforms that rise from the checkpoint to a high landing. Any layout a player can actually climb is a correct answer — the designer check at the end will prove yours works.
- Build your climb inside the Stage zero one folder. Straight line, curve, or corner — your call. Follow the rules: rising tops, jumpable gaps, everything anchored with Can Collide on.
- Press Play and climb from Checkpoint zero one to your top platform. If a jump fails, press Stop and shrink that one gap before touching anything else.
- Spoken bridge: You made it to the top of a climb you designed. Now build the goal so the game can save that win.
Now the fun part: design the climb. Pick your Build Mode below and build at least three platforms that rise from the checkpoint to a high landing. Any layout that a player can actually climb is a correct answer — the designer check at the end will prove yours works.
Every builder plays this stage in their own mode. Which sounds like you?
Not sure? Start with Guided — you can level up on any stage, and your pick follows you through the whole course.
Names that must match
Build inside Workspace → Course → Stage01, from Checkpoint_01 to Checkpoint_02. No scripts yet — these names keep your Explorer readable, and future stages will find your pieces by name. Everything else about each object is your call.
Step_1Your first platform. Name every platform Step_N in climb order — build as many as your design needs; three is the minimum.Step_2The next platform up.Step_3Higher again — keep numbering (Step_4, Step_5…) if your climb keeps going.Landing_02The wide landing that ends the stage — Checkpoint_02 stands here.
Reference buildStuck, or just want to copy ours? Here is exactly how we built this stage.
These values always work together. Copy them as-is, or borrow a few and keep the rest of the stage yours.
Build this partStep_1
Part · BlockOpen recipe
Step_1
Part · Block- Size
- 6 × 2 × 6
- Anchored
- ✓ Yes
- Orientation
- 0 × 0 × 0
- CanCollide
- ✓ Yes
- Place
- Position [0, 1, 22] inside Workspace → Course → Stage01
Build this partStep_2
Part · BlockOpen recipe
Step_2
Part · Block- Size
- 6 × 4 × 6
- Anchored
- ✓ Yes
- Orientation
- 0 × 0 × 0
- CanCollide
- ✓ Yes
- Place
- Position [0, 1, 31] inside Workspace → Course → Stage01
Build this partStep_3
Part · BlockOpen recipe
Step_3
Part · Block- Size
- 6 × 6 × 6
- Anchored
- ✓ Yes
- Orientation
- 0 × 0 × 0
- CanCollide
- ✓ Yes
- Place
- Position [0, 1, 40] inside Workspace → Course → Stage01
Build this partLanding_02
Part · BlockOpen recipe
Landing_02
Part · Block- Size
- 12 × 1 × 12
- Anchored
- ✓ Yes
- Orientation
- 0 × 0 × 0
- CanCollide
- ✓ Yes
- Place
- Position [0, 3.5, 52] inside Workspace → Course → Stage01
Build your climb inside the Stage01 folder — straight, curved, or cornered, your call. Rising tops, jumpable gaps, everything anchored with CanCollide on.
Press Play and climb from Checkpoint_01 to your top platform. If a jump fails, press Stop and shrink that one gap before touching anything else.
Narration transcript
- Every stage ends on a landing wide enough to feel safe. Yours goes at the top of your climb.
- Inside Stage zero one, add an anchored Part named Landing underscore zero two at the top of your climb. Make it wide enough that landing there feels easy — our reference build uses twelve by one by twelve.
- Insert a Spawn Location in Workspace named Checkpoint underscore zero two. Size about six by one by six, anchored, centered on your landing with its top just above the landing surface.
- Set Neutral to false, Enabled to true, and Allow Team Change On Touch to true.
- Set Checkpoint zero two Team Color and Brick Color to Bright green.
- Inside Teams, add a Team named Stage Two. Set Team Color to Bright green and leave Auto Assignable off.
- Press Play. Climb to and touch Checkpoint underscore zero two. Then reset your character and confirm you respawn there. Press Stop before editing again.
- Spoken bridge: Checkpoint saved. You designed a complete playable stage. One designer check before the victory lap: does it pass?
Every stage ends on a landing wide enough to feel safe. Yours goes at the top of your climb.
Inside Stage01, add an anchored Part named Landing_02 at the top of your climb — wide enough that landing there feels easy. (Our reference build uses [12, 1, 12].)
Create the Stage 2 checkpoint from the recipe. Touch it, reset your character, and confirm you return there.
Checkpoint recipeSave progress at Stage 2
Using the voice guide? It reads one recipe step, waits while you work, then continues when you choose Done — hear next step.
- Insert one SpawnLocation in Workspace and rename it
Checkpoint_02. Set Size to about[6, 1, 6]and Anchored totrue. Centered on the landing that ends Stage 1, with its top just above the landing surface. (Our reference build puts it at Position[0, 4.5, 52].) - Set Neutral to
false, Enabled totrue, and AllowTeamChangeOnTouch totrue. - Set the SpawnLocation TeamColor to
Bright green. Set its visual BrickColor to the same named color. TeamColor controls respawning; BrickColor only controls what the pad looks like. - Point at Teams in Explorer, select its +, and insert one Team named
Stage 2. Set its TeamColor toBright greenand AutoAssignable tofalse. Never reuse this TeamColor on another checkpoint. - Press Play. Climb to and touch
Checkpoint_02, then reset your character and confirm you respawn there. Press Stop before editing again.
Workspace → Checkpoint_02Teams → Stage 2 (Bright green)Does It Pass?
Narration transcript
- Time for the designer check. Play your stage and walk the pass list: the climb goes up, every jump can be made with a normal jump, nothing moves or drops you, and reaching the top saves your progress. A rule that fails is just the next thing to tune.
- Spoken bridge: Your stage passes — it is a real level now. Time to put your stamp on it.
Does your stage pass?
Play your stage and check each one. A rule that fails isn't a mistake — it's just the next thing to tune.
- Your climb goes up — each platform takes you higher than the last.Check: Walk it in Play mode: every step up works with a normal jump.Tip: Rises of 1–3 studs feel snappy. Higher starts demanding a perfect jump.
- Every jump can be made with a normal jump — no luck needed.Check: Clear every jump three times in a row.Tip: Gaps of 3–5 studs between edges feel fair. Bigger starts demanding a running start — save those for a Boss Quest.
- Nothing moves, falls, or lets a player slip through.Check: Press Play — every part stays put.Tip: That's Anchored on and CanCollide on, for every part.
- Reaching the top saves your progress.Check: Touch Checkpoint_02, reset your character, and respawn there.
Make It Yours
Narration transcript
- Back in Setup you chose your world. Now make Stage One say it: recolor your platforms so a player knows where they are, and keep both checkpoints looking different from ordinary platforms so players always spot a save point.
- Spoken bridge: Now it looks like your game. Let's uncover why Roblox sends the player back to your checkpoint.
Back in Setup you chose your world — your world. Now make Stage 1 say it: recolor your platforms so a player knows where they are, and keep both checkpoints looking different from ordinary platforms so players always spot a save point. (Changed your mind? Update your Game Card in Setup any time.)
Help Ladder
Stuck? Choose what went wrong
Pick the problem that matches. Open one clue, try it, then return only if you still need help.
My parts overlap or miss the next checkpoint
Clue 1: small hint
Narration transcript
- Stop Play mode. Fix one part at a time — usually the one gap or height that failed — instead of dragging the whole stage.
Clue 2: where to look
Narration transcript
- Find your build parts in Workspace, Course, Stage zero one. Find Checkpoint zero one and Checkpoint zero two directly inside Workspace. Then walk your stage rules from the top: rising tops, three to five stud gaps, everything anchored.
Workspace → Course → Stage01. Find Checkpoint_01 and Checkpoint_02 directly inside Workspace.Clue 3: worked answer
Narration transcript
- Fix the first rule that fails: raise or lower one platform so each top is one to three studs higher, and shrink any gap wider than five studs. If you want a layout that always works, open the reference build and copy its values. Then playtest again from Checkpoint zero one.
Checkpoint_01.I respawn at the wrong checkpoint
Clue 1: small hint
Narration transcript
- A Spawn Location only connects to the Team with the same Team Color.
Clue 2: where to look
Narration transcript
- Compare the Team Color on the Spawn Location with the Team Color on its matching Team. Ignore Brick Color while debugging.
Clue 3: worked answer
Narration transcript
- Checkpoint zero one and Stage One share Bright blue, with Auto Assignable on. Checkpoint zero two and Stage Two share Bright green, with Auto Assignable off. Touch Checkpoint zero two and reset again.
Learn What Happened
Narration transcript
- Matching Team Color values connect each Spawn Location to its Team. Each checkpoint needs a different Team Color, so Roblox has one eligible respawn point for that stage. Auto Assignable stays on only for Stage One, so new players cannot skip ahead. Brick Color changes how a checkpoint looks, but it does not control respawning. That is why your layout could be anything — the connections, not the coordinates, make it work.
- Spoken bridge: Now you know what controls respawning. Let's test that understanding with two quick creator challenges.
Matching TeamColor values connect each SpawnLocation to its Team. Every checkpoint uses a different TeamColor, so Roblox has exactly one eligible respawn point for that stage. AutoAssignable stays on only for Stage 1 so new players cannot skip ahead. BrickColor makes a checkpoint look like its TeamColor but does not control respawning. That's why your layout could be anything — the connections, not the coordinates, make it work.
Try This
Narration transcript
- Without changing your working game, predict what would happen if the Stage Two Team Color did not match Checkpoint zero two.
- Say your stage out loud as a designer: start at, then, finally. Does your sentence cover a start, a challenge, and a goal?
- Spoken bridge: Nice explanation. You connected your build back to the design. Now complete four final proof checks to lock in Stage One.
Try this
Two short thinking checks. Use evidence from the stage you just built.
Prove It
Narration transcript
- Spoken bridge: Final proof. Check one result at a time.
- Start a new playtest. Confirm your player begins at Stage One, then press Stop.
- Check every platform in your climb. Each one must be anchored, and you must be able to climb from start to goal with normal jumps.
- Touch Checkpoint zero two and reset your character.
- Explain your stage using three words: start, challenge, goal.
Narration transcript
- You did it—Stage One complete. You designed your own climb, connected it to two checkpoints, proved that the game saves progress, and earned one hundred XP. Next up: Stage Two, where the path itself starts changing shape under your players' feet.