Setup: Found Your Game Studio
You need a Windows or Mac computer (Roblox Studio does not run on iPads or Chromebooks), a free Roblox account, and Roblox Studio installed from create.roblox.com. Setup takes about 30 minutes; every stage after it takes about 45. If Studio will not install, open, or sign in after retrying, ask an adult to help with that one device or account issue — everything else in this course you can do yourself.
Narration transcript
- Spoken bridge: Your first checkpoint is waiting. Before you build the jumps, let's found your game studio and give your obby a safe place to begin.
- Your setup mission is to name your game, pick its world, and build the place where it begins.
- Found your studio, open your workshop, try the tools on a practice block, then build and save a safe starting place.
- This short setup prepares your game and the Studio moves you need. Setup awards zero XP. Your first one hundred XP quest begins in Stage One.
Creator Lobby · Setup mission
Name your game and build where it begins
Found your studio, open your workshop, try the tools on a practice block, then build and save a safe starting place.- 1Found
- 2Open
- 3Practice
- 4Build + save
 Next: Stage 1 · +100 XP
Today you found your game studio: you'll name your game, pick its world, learn the Studio moves every builder uses, and build the place where your obby begins. You will not earn XP here; your first 100-XP quest begins in Stage 1.
Idea
Narration transcript
- You are building one game in one Studio file. Setup creates the starting place. Every stage after this adds a new playable section to the same obby.
- You do not need to memorize every Studio button. Find the few tools you need, practice them on a block you can delete, then use them to build something real.
- Spoken bridge: But first, the fun part: make this game yours.
You are building one game in one Studio file. Setup creates the starting place. Every stage after this adds a new playable section to the same obby.
Creators do not need to memorize every Studio button before they begin. Find the few tools you need, practice them on a block you can delete, then use them to build something real.
Your Game Card
Narration transcript
- Every real game starts with three decisions. A name that sounds like a game you'd tap on. A world, so every stage knows what it looks like. And a Build Mode — how you like the course to talk to you.
- Fill in your Game Card. Name your game — never your real name, school, or town. Pick your world, or invent one. Then pick the Build Mode that sounds like you. Not sure? Guided is a great start, and you can switch on any stage.
- Spoken bridge: That name is going on a real Roblox game. Now let's build it a home — turn that plan into three small setup cards.
Before any building, make this game yours. Real studios start exactly this way: a name, a world, and a plan for how you like to work. Your choices follow you through all ten stages — and yes, you can change any of them later.
Every real game starts with three decisions
Never use your real name, school, or town in a game title.
2 · Pick your world. Every stage will ask what this looks like in your world.
3 · Pick your Build Mode. It's how every stage talks to you — and you can switch on any stage, penalty-free.
Not sure? Guided is a great start — you can level up on any stage.
Finish these cards from left to right. Each card becomes a Code Quest below.
- 1Card A
Narration transcript
- Spoken bridge: Logic Card A: open the workshop.
- Open a clean Baseplate and get the important Studio controls ready.
- You are done when you can move the camera and see Explorer, Properties, and Output.
Open the workshop
Open a clean Baseplate and get the important Studio controls ready.
Done when: You can move the camera and see Explorer, Properties, and Output. - 2Card B
Narration transcript
- Spoken bridge: Logic Card B: try the tools.
- Practice precise properties, transforms, and duplication on a temporary block.
- You are done when you can change a part by hand and by typing values.
Try the tools
Practice precise properties, transforms, and duplication on a temporary block.
Done when: You can change a part by hand and by typing values. - 3Card C
Narration transcript
- Spoken bridge: Logic Card C: build the starting place.
- Replace the floor with a safe start, playtest it, and save the game.
- You are done when your character spawns safely and your game file is saved.
- Spoken bridge: Plan ready. Start with Card A and get your Roblox Studio workshop under control.
Build the starting place
Replace the floor with a safe start, playtest it, and save the game.
Done when: Your character spawns safely and your game file is saved.
Build
Open your workshop
Narration transcript
- Start with a blank Roblox world, then set up the controls that will guide every build.
- Open Roblox Studio and choose Baseplate. Keep the default Baseplate and Spawn Location for now.
- Make Explorer, Properties, and Output visible. Open them from Window or from the panel controls on Home.
- Hold the right mouse button and drag to look around. Use the mouse wheel to zoom. Hold the right mouse button with W, A, S, or D to fly. Select Baseplate and press F to focus.
- On Model, set Move snapping to one stud and Rotate snapping to fifteen degrees. Find Select, Move, Scale, Rotate, Play, and Stop.
- Workshop check complete. You can move around the world and find the panels that help you build and debug.
- Spoken bridge: Your workshop is ready. Next, try the build tools on a block you can safely delete.
Start with a blank Roblox world, then set up the controls that will guide every build.
- Open Roblox Studio and choose Baseplate. Keep the default Baseplate and SpawnLocation for now.
- Make sure Explorer, Properties, and Output are visible. Open them from Window or from the panel controls on Home. Studio layouts can move, so look for the panel names.
Know your Roblox Studio workspace
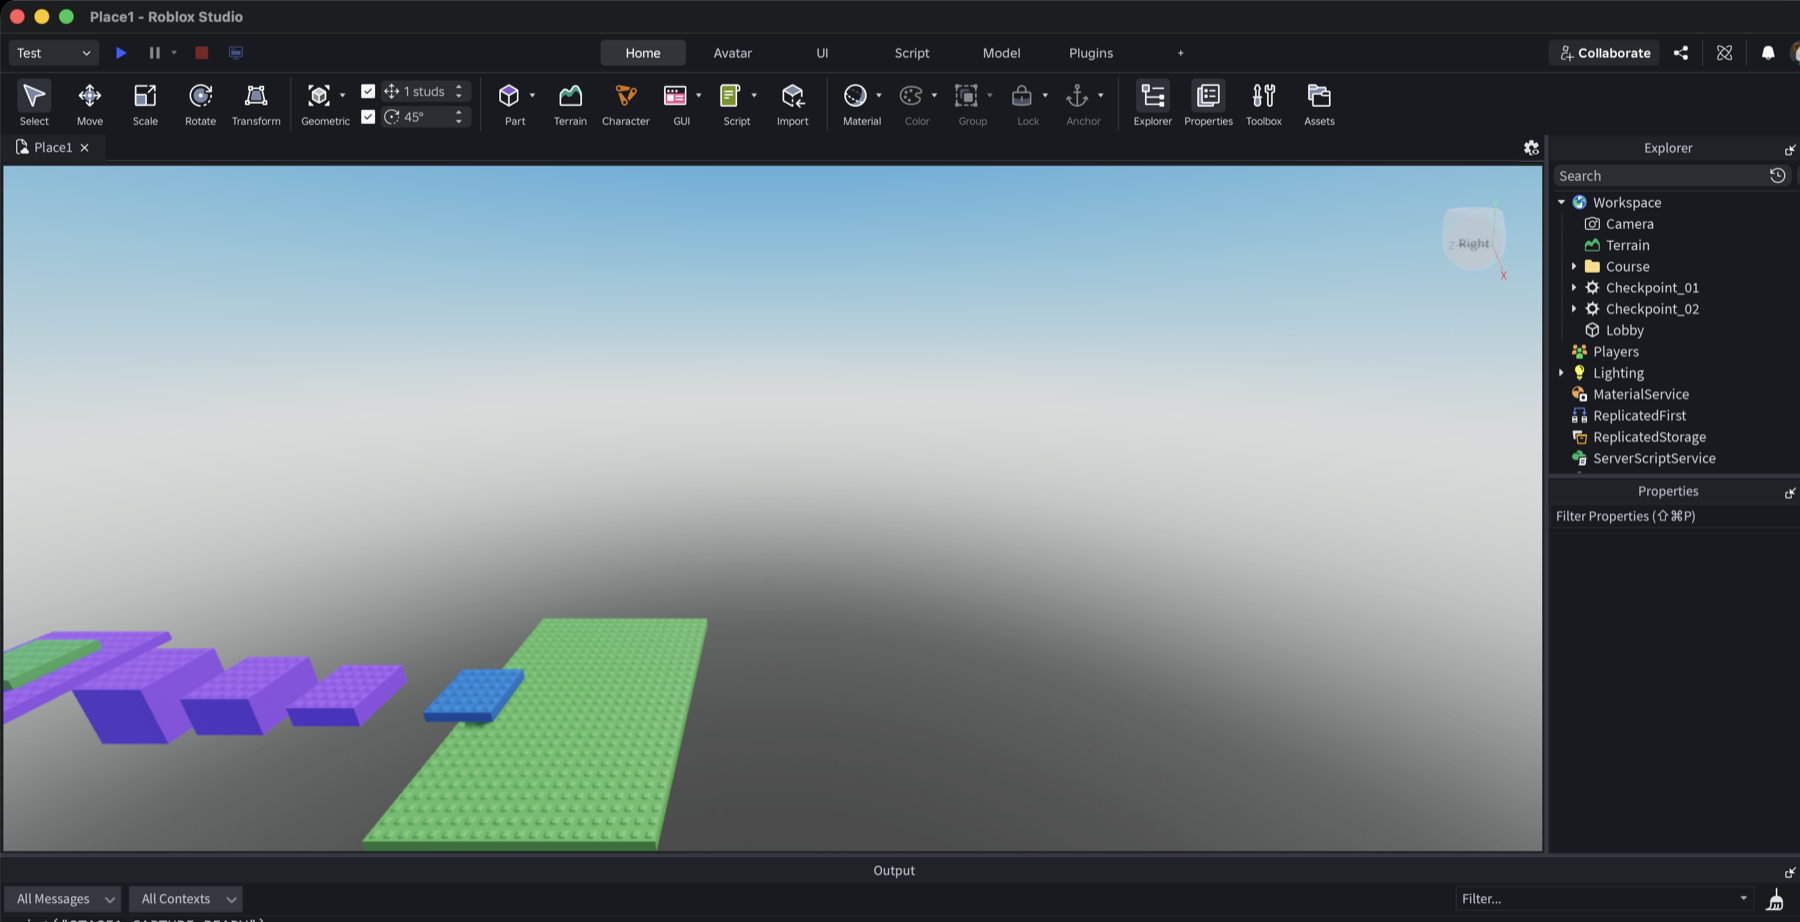
Your panels may be arranged differently, but their names and jobs stay the same. Use this map whenever a control goes missing.
- Play and Stop: Use these to enter and leave a playtest.
- 3D viewport: Build, move the camera, and see your game here.
- Explorer: Shows where every object lives.
- Properties: Shows the values for the selected object.
- Output: Shows script messages and red errors.
- In the 3D view, hold the right mouse button and drag to look around. Use the mouse wheel to zoom. Hold the right mouse button while pressing W, A, S, or D to fly. Select Baseplate in Explorer and press F to focus on it.
- Open the Model tab. Set Move snapping to 1 stud and Rotate snapping to 15 degrees. Find Select, Move, Scale, Rotate, Play, and Stop.
Workshop check: you can look around the world, focus on a part, and point to the three panels that help you build and debug.
Try the tools on a practice block
Narration transcript
- This is a safe practice round. You will delete both blocks before building the real obby.
- In Explorer, point at Workspace, choose its plus, insert a Part, and rename it Practice Block.
- Select Practice Block. Set Size to six by two by six and Position to zero by five by zero.
- Use Move, Scale, and Rotate once each. Then return the block to Size six by two by six, Position zero by five by zero, and Orientation zero by zero by zero.
- Duplicate the block with Control D on Windows or Command D on Mac. Rename the copy Practice Copy and move it eight studs along the blue Z axis.
- Delete Practice Block and Practice Copy. Leave Baseplate and Spawn Location in Workspace.
- Tool check complete. You changed a part two ways: by hand with the transform tools, and precisely by typing values. Dragging is for designing. Typing is for when a rule needs a part in one exact spot. You will use both, and the choice will be yours.
- Spoken bridge: Practice round complete. Now use the same moves to build the first real pieces of your game.
This block is a safe test. Nothing you do to it can hurt the obby because you will delete it when the practice round is over.
- In Explorer, point at Workspace, choose its +, and insert a Part. Rename it
PracticeBlock. - Select PracticeBlock. In Properties, enter Size
[6, 2, 6]and Position[0, 5, 0]. Three numbers, typed in X, Y, Z order — that's how you place a part exactly where you want it. - Use Move, Scale, and Rotate once each. Then use Properties to return the block to Size
[6, 2, 6], Position[0, 5, 0], and Orientation[0, 0, 0]. - Duplicate it with Ctrl+D on Windows or Command+D on Mac. Rename the copy
PracticeCopyand move it 8 studs along the blue Z axis. - Delete PracticeBlock and PracticeCopy. Workspace should contain only Baseplate and SpawnLocation again.
Tool check: you changed a part two ways — by hand with the transform tools, and precisely by typing values. Dragging is for designing; typing is for when a rule needs a part in one exact spot. You'll use both, and the choice will be yours.
Build, test, and save the starting place
Narration transcript
- Now use those same moves on the first real pieces of your game.
- Delete Baseplate from Workspace. Keep Spawn Location.
- Insert a Part in Workspace named Lobby. Set Size to thirty by one by thirty, Position to zero by zero by zero, and Anchored to true.
- Select Spawn Location and rename it Checkpoint underscore zero one. Set Size to six by one by six, Position to zero by one by ten, and Anchored to true.
- Insert a Folder in Workspace and rename it Course.
- Press Play. Confirm your character appears safely on Lobby. Press Stop before editing again, then check that Output has no red errors.
- Choose File, Save to File As, and save the project with your game's name from your Game Card. Still deciding? My Obby works until you know. Keep personal information out of the file name.
- Build check complete. Your game has a safe starting platform, its first named checkpoint, an organized Course folder, and a saved file with its name on it.
- Spoken bridge: Your starting place passed its first playtest. Next, connect the Studio tools you used to what the player experienced.
Now use those same moves on the first real pieces of your game.
- Delete Baseplate from Workspace. Keep SpawnLocation. With no giant floor below the obby, falling will matter.
- Insert a Part in Workspace and rename it
Lobby. This is the obby's Start Platform. Set Size to[30, 1, 30], Position to[0, 0, 0], and Anchored totrue. - Select SpawnLocation and rename it
Checkpoint_01. Set Size to[6, 1, 6], Position to[0, 1, 10], and Anchored totrue. Stage 1 will connect this pad to the checkpoint system. - Insert a Folder in Workspace and rename it
Course. Every stage will get its own folder inside Course. - Press Play. Your character should appear safely on Lobby. Press Stop before editing again, then confirm Output has no red errors.
- Choose File → Save to File As… and save the project as your game's name from your Game Card — like
SkyDash.rbxl. Still deciding?MyObby.rbxlworks until you know. Never put your full name, school, address, or other personal information in the file or a future game title.
Build check: your game now has a safe starting platform, its first named checkpoint, an organized Course folder, and a saved file with its name on it — a file you will keep improving for the rest of this course.
Learn What Happened
Narration transcript
- Explorer tells you where an object lives. Properties tells you what values it stores. The 3D view shows the result, and Play proves whether the result works for a player.
- You also built the starting pieces Stage One picks up: Lobby, Checkpoint zero one, and the Course folder. Their names are what matter — they are how the rest of your game will find them. The next page can begin with game design instead of repeating setup.
- Spoken bridge: One final check will make sure the file is ready to hand off to Stage One.
Explorer tells you where an object lives. Properties tells you what values it stores. The 3D view shows the result, and Play proves whether the result works for a player.
You also built the starting pieces Stage 1 picks up — Lobby, Checkpoint_01, and the Course folder. Their names are what matter: they're how the rest of your game will find them. Stage 1 picks them up by name and starts straight away with game design.
Prove It
Narration transcript
- Check the finished result, not just the instructions you read.
- Confirm the three panels are visible. Check Lobby, Checkpoint zero one, and Course in Workspace. Playtest the safe spawn, return to edit mode, and confirm your game file is saved.
- Spoken bridge: Setup proven. Your file is ready for the first playable stage.
Check the finished result, not just the instructions you read.
Help Ladder
Stuck? Choose what went wrong
Pick the problem that matches. Open one clue, try it, then return only if you still need help.
I cannot find a Studio panel
Clue 1: small hint
Clue 2: where to look
Clue 3: worked answer
my final setup does not match
Clue 1: small hint
Clue 2: where to look
Clue 3: worked answer
Lobby at [0, 0, 0], Checkpoint_01 anchored on top of it, and a Folder named Course. Delete Baseplate and both practice parts.Narration transcript
- Setup complete. Your game has a name, a world, and a Build Mode, and its starting place passed a real playtest. Stage One starts from this file. Wire your first checkpoint, design your own first climb, and earn your first one hundred XP.