Stage 10: Puzzle Room
Finish Stage 9: Kinetic KillWall first. You have an Orange Stage 10 checkpoint past the hallway, and you understand numeric for loops and parameterized geometry.
a puzzle room with three buttons, a clue display, and a back wall that opens to a celebration room when the correct sequence is pressed
tables as ordered lists, ClickDetector + MouseClick events, and a real state machine that tracks `currentIndex` across multiple events
the final checkpoint and the most complete Lua script in the course
The big idea
The first nine stages tested reflex: jump, dodge, sprint, time the hazard.
Stage 10 tests logic. The player must press three buttons in order. A wrong button resets the sequence.
This is the most complex script in the course, but every piece comes from an earlier pattern.
The new pieces are tables and ClickDetectors. A table stores the answer. A ClickDetector lets a part listen for clicks instead of touches.
The capstone design lesson: a puzzle without a clue is just a guess.
We add a clue wall that shows the correct sequence. Careful players solve it faster. Everyone can still finish.
- table
- Lua's ordered list — `{"Green", "Red", "Blue"}` is a table of three strings
- ClickDetector
- an object that, when added to a Part, makes the part clickable by players
- MouseClick
- the event a ClickDetector fires when a player clicks the part
- state machine
- code that remembers its current state and behaves differently in each state — perfect for puzzles
- :Destroy
- removes an object from the game; the back wall :Destroy()s itself when the puzzle is solved
Build it
Step 1 — Build the puzzle room
A 3-walled room — floor, two side walls, back wall. The fourth side (toward the Orange pad) is open so the player can enter.
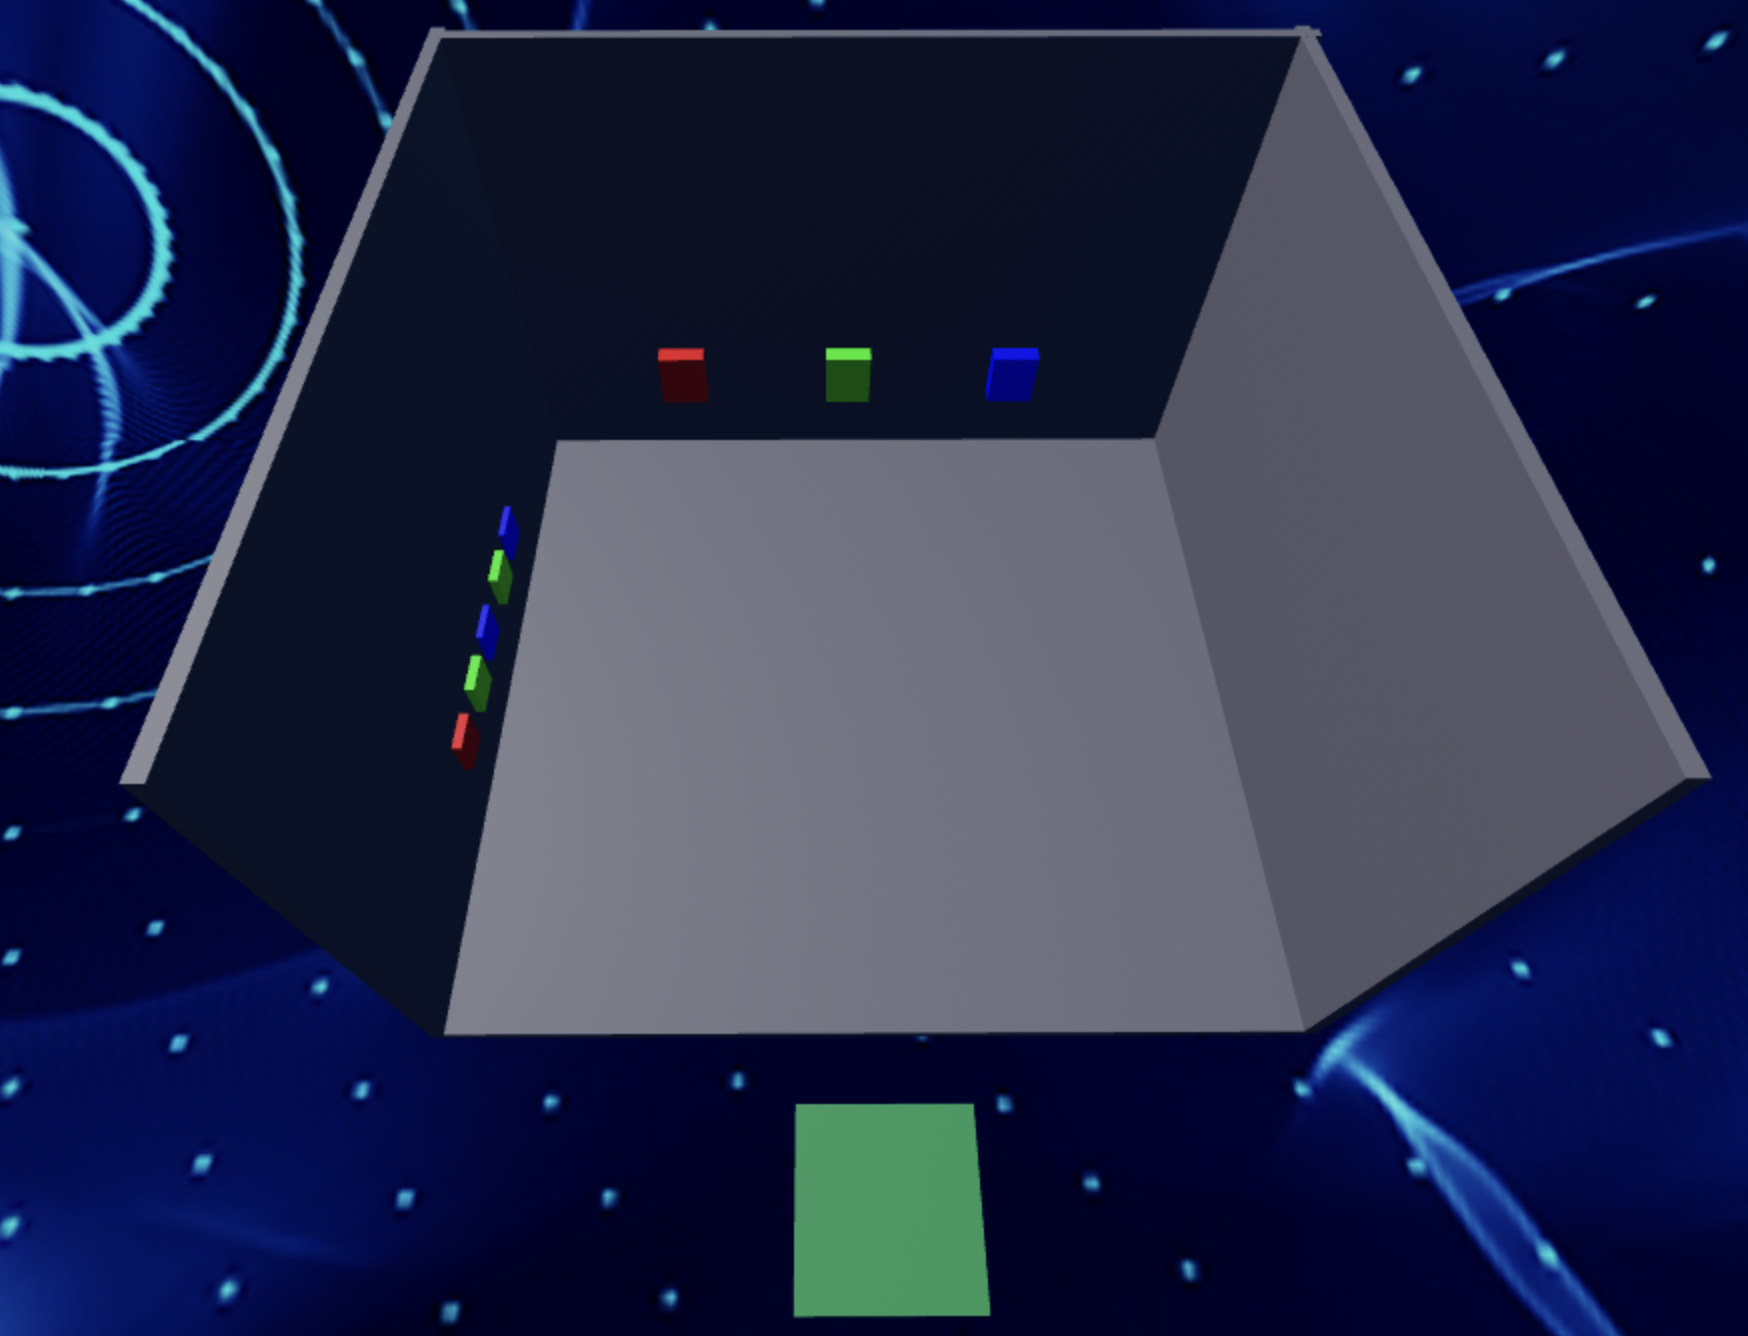
Build this partPuzzleFloor
BlockOpen recipe
PuzzleFloor
Block- Size
- 12 × 1 × 12
- Color
- Dark stone grey
- Material
- Concrete
- Anchored
- ✓ Yes
- Place
- Starting at the Stage 10 Orange pad, stretching forward 12 studs
Build this partPuzzleWall_Left
BlockOpen recipe
PuzzleWall_Left
Block- Size
- 1 × 8 × 12
- Color
- Brick yellow
- Material
- Brick
- Anchored
- ✓ Yes
- Place
- Along the left edge of PuzzleFloor
Build this partPuzzleWall_Right
BlockOpen recipe
PuzzleWall_Right
Block- Size
- 1 × 8 × 12
- Color
- Brick yellow
- Material
- Brick
- Anchored
- ✓ Yes
- Place
- Along the right edge of PuzzleFloor (mirror of the left wall)
Build this partPuzzleWall_Back
BlockOpen recipe
PuzzleWall_Back
Block- Size
- 12 × 8 × 1
- Color
- Really red
- Material
- Neon
- Anchored
- ✓ Yes
- Place
- At the far end of the room — this is the wall that the puzzle will Destroy when solved
The script finds this by name — leave it named 'PuzzleWall_Back' exactly. Solid red so the player knows 'this is the goal wall.'
Step 2 — Build the three buttons
Three buttons on the floor in front of the back wall — Green, Red, Blue. The script will check what order the player presses them.
Build this partButton_Green
CylinderOpen recipe
Button_Green
Cylinder- Size
- 1 × 2 × 2
- Color
- Lime green
- Material
- Neon
- Anchored
- ✓ Yes
- Place
- On PuzzleFloor, leftmost of three buttons
Cylinder with X = 1 looks like a flat disc — like a real button.
Build this partButton_Red
CylinderOpen recipe
Button_Red
Cylinder- Size
- 1 × 2 × 2
- Color
- Really red
- Material
- Neon
- Anchored
- ✓ Yes
- Place
- On PuzzleFloor, middle of three buttons
Build this partButton_Blue
CylinderOpen recipe
Button_Blue
Cylinder- Size
- 1 × 2 × 2
- Color
- Bright blue
- Material
- Neon
- Anchored
- ✓ Yes
- Place
- On PuzzleFloor, rightmost of three buttons
Step 3 — Add the clue display
The clue is three colored squares on the left wall: Green, Red, Blue.
Players who notice the wall pattern get the answer.
Insert three small flat parts on the left wall.
Each one is size [0.2, 1.5, 1.5]. Use Lime green, Really red, Bright blue, in that order from front to back.
They do not need scripts. They are decoration with a purpose.
Step 4 — Add the celebration room beyond the back wall
A small open area past PuzzleWall_Back with the final SpawnLocation.
Build this partCelebrationFloor
BlockOpen recipe
CelebrationFloor
Block- Size
- 12 × 1 × 16
- Color
- Bright yellow
- Material
- Marble
- Anchored
- ✓ Yes
- Place
- On the far side of PuzzleWall_Back — the floor of the celebration room
Build this partSpawnLocation (Finished — the end of the obby)
BlockOpen recipe
SpawnLocation (Finished — the end of the obby)
Block- Size
- 6 × 1 × 6
- Color
- Bright yellow
- Material
- Marble
- Anchored
- ✓ Yes
- Place
- In the center of CelebrationFloor
Also: check AllowTeamChangeOnTouch. Uncheck Neutral. Set TeamColor to Bright yellow. In Teams, insert a Team named 'Finished', uncheck AutoAssignable, set its TeamColor to Bright yellow. This is the player's final destination — they should respawn here forever once they finish.
Step 5 — Add ClickDetectors to the buttons
A button can't be clicked unless it has a ClickDetector child. We add one to each button via the Explorer panel — no script needed for this step.
- Right-click Button_Green → Insert Object → ClickDetector.
- Repeat for Button_Red and Button_Blue.
Each ClickDetector has a default MaxActivationDistance of 32 studs — close enough that the player has to walk up to the button to click it. That's the design we want.
Step 6 — Write the puzzle state machine
The whole puzzle is one script. It needs to listen to all three buttons and destroy the back wall.
Put the Script inside PuzzleWall_Back. That keeps the script next to the wall it controls.
Right-click PuzzleWall_Back → Insert Object → Script. Build the required script in three passes, then add optional sound polish if you want feedback clicks.
Pass 1 — Find the buttons and confirm they're wired
local wall = script.Parent

local greenButton = workspace:WaitForChild("Button_Green")
local redButton = workspace:WaitForChild("Button_Red")
local blueButton = workspace:WaitForChild("Button_Blue")

print("Found all three buttons. Wall is:", wall.Name)
Press Play. Output prints "Found all three buttons. Wall is: PuzzleWall_Back". If any button is missing or misnamed, you'll see an error — fix the name in Explorer.
Pass 2 — Listen for clicks on each button
local wall = script.Parent

local greenButton = workspace:WaitForChild("Button_Green")
local redButton = workspace:WaitForChild("Button_Red")
local blueButton = workspace:WaitForChild("Button_Blue")

greenButton.ClickDetector.MouseClick:Connect(function(player)
  print(player.Name, "clicked Green")
end)

redButton.ClickDetector.MouseClick:Connect(function(player)
  print(player.Name, "clicked Red")
end)

blueButton.ClickDetector.MouseClick:Connect(function(player)
  print(player.Name, "clicked Blue")
end)
Press Play. Walk up to each button and click it. Each click prints to Output. The player argument is the player who clicked (each MouseClick passes the clicking player in automatically).
Pass 3 — Track the sequence with a state machine
Now the heart of the puzzle. We track which button comes next in the correct sequence using a currentIndex integer and a correctOrder table.
local wall = script.Parent

local greenButton = workspace:WaitForChild("Button_Green")
local redButton = workspace:WaitForChild("Button_Red")
local blueButton = workspace:WaitForChild("Button_Blue")

-- The correct sequence: Green, Red, Blue
local correctOrder = {"Green", "Red", "Blue"}
local currentIndex = 1  -- which button comes next in the sequence

local function handleButton(buttonName)
  local expected = correctOrder[currentIndex]
  print(buttonName, "pressed. Expected:", expected)

  if buttonName == expected then
    currentIndex = currentIndex + 1
    print("Correct! Next expected:", correctOrder[currentIndex])

    if currentIndex > #correctOrder then
      print("PUZZLE SOLVED!")
      wall:Destroy()
    end
  else
    print("Wrong! Resetting sequence.")
    currentIndex = 1
  end
end

greenButton.ClickDetector.MouseClick:Connect(function()
  handleButton("Green")
end)

redButton.ClickDetector.MouseClick:Connect(function()
  handleButton("Red")
end)

blueButton.ClickDetector.MouseClick:Connect(function()
  handleButton("Blue")
end)
Press Play. Click Green, Red, Blue in order — the back wall disappears. Click them in the wrong order — Output prints "Wrong! Resetting sequence." and you have to start over.
Optional polish — Add sound effects for correct and incorrect
The puzzle is complete after Pass 3. Sound effects are optional because Roblox audio choices can vary by account and classroom.
If you want audio feedback, right-click PuzzleWall_Back → Insert Object → Sound twice. Name one CorrectSound, the other WrongSound. Pick short sounds from Toolbox → Audio, then set each Sound's SoundId.
Add these two sound variables near the top, right after the button variables. FindFirstChild means the script still works even if one of the sounds is missing.
local correctSound = wall:FindFirstChild("CorrectSound")
local wrongSound = wall:FindFirstChild("WrongSound")
Then replace your whole handleButton function with this version. Do not paste this below the old function — there should only be one handleButton in the script.
local function handleButton(buttonName)
  local expected = correctOrder[currentIndex]

  if buttonName == expected then
    if correctSound then
      correctSound:Play()
    end

    currentIndex = currentIndex + 1
    print("Correct! Next expected:", correctOrder[currentIndex])

    if currentIndex > #correctOrder then
      print("PUZZLE SOLVED!")
      wait(0.5)  -- let the last correct sound finish
      wall:Destroy()
    end
  else
    if wrongSound then
      wrongSound:Play()
    end

    currentIndex = 1
  end
end
Press Play. Correct presses play a ding if you added CorrectSound. Wrong presses play a buzz if you added WrongSound.
Finish the sequence and the wall disappears. Walk through to the celebration room and the final spawn pad.
Understand it
The correctOrder table is Lua's ordered list.
correctOrder[1] is "Green", correctOrder[2] is "Red", and correctOrder[3] is "Blue". Lua starts table indexes at 1.
The currentIndex state variable remembers how far through the sequence the player has gotten. A correct press advances it. A wrong press resets it to 1.
The handleButton function is the puzzle brain. Every button click calls this function with a color name.
The function compares that color to correctOrder[currentIndex]. Match means advance. No match means reset.
The if currentIndex > #correctOrder then check detects the win. #correctOrder means "how many items are in the table."
wall:Destroy() removes the back wall from the game. The player can now walk through where it was. There's no respawn — once Destroy is called, the part is gone. This is the simplest possible "win" mechanic.
The per-button MouseClick:Connect lines wire the physical buttons to the shared function. One function handles the puzzle; each button only sends its color.
How this script remembers a button sequence
This is the capstone pattern: events from three buttons all flow into one function, and one state variable remembers how far the player has gotten.
local wall = script.Parent

local greenButton = workspace:WaitForChild("Button_Green")
local redButton = workspace:WaitForChild("Button_Red")
local blueButton = workspace:WaitForChild("Button_Blue")

local correctSound = wall:FindFirstChild("CorrectSound")
local wrongSound = wall:FindFirstChild("WrongSound")

local correctOrder = {"Green", "Red", "Blue"}
local currentIndex = 1

local function handleButton(buttonName)
  local expected = correctOrder[currentIndex]

  if buttonName == expected then
    if correctSound then
      correctSound:Play()
    end

    currentIndex = currentIndex + 1
    print("Correct! Next expected:", correctOrder[currentIndex])

    if currentIndex > #correctOrder then
      print("PUZZLE SOLVED!")
      wait(0.5)
      wall:Destroy()
    end
  else
    if wrongSound then
      wrongSound:Play()
    end

    print("Wrong! Resetting sequence.")
    currentIndex = 1
  end
end

greenButton.ClickDetector.MouseClick:Connect(function()
  handleButton("Green")
end)

redButton.ClickDetector.MouseClick:Connect(function()
  handleButton("Red")
end)

blueButton.ClickDetector.MouseClick:Connect(function()
  handleButton("Blue")
end)
Lines 1–5Find every object this puzzle controls or listens to.
`wall` is the thing that disappears when the puzzle is solved. The three button variables are the parts the player clicks. `WaitForChild` makes naming mistakes easier to catch in Output.
Lines 7–8Find the feedback sounds.
The sounds are optional children of PuzzleWall_Back in Explorer. `FindFirstChild` returns a Sound if it exists, or nil if it does not, so the puzzle still works without audio.
Lines 10–11Store the answer and the player's progress.
`correctOrder` is the answer key. `currentIndex` starts at 1, meaning the next correct click should match the first item in the table. This is the memory that survives between clicks.
Lines 13–14Start one function that handles every button.
`handleButton("Green")`, `handleButton("Red")`, and `handleButton("Blue")` all come here. The function checks the clicked color against `correctOrder[currentIndex]`, the color expected right now.
Lines 16–30If the click is correct, move one step forward.
A correct click plays the ding if the optional sound exists, then increases `currentIndex`. If `currentIndex` moves past the length of `correctOrder`, all required buttons were pressed in order, so the script waits half a second and destroys the wall.
Lines 31–38If the click is wrong, reset the memory.
A wrong click plays the buzz if the optional sound exists, then sets `currentIndex` back to 1. The player is not just pressing buttons; they are proving they can follow the sequence from the beginning.
Lines 41–51Connect the physical buttons to the shared puzzle brain.
Each MouseClick connection passes a different color string into the same function. The puzzle logic is written once instead of copied three times.
Try this
Try this
Three short experiments. Predict before you run, then test your guess.
Change correctOrder to {\"Red\", \"Blue\", \"Green\"}. Predict which sequence the puzzle now wants. Click the buttons in the new order to verify.
Comment out currentIndex = 1 in the else branch. Play the stage. Click buttons in the wrong order, then in the right order. What happens? Why is the reset line essential?
The puzzle uses a currentIndex integer to track state. Stage 6 used a revealed boolean. Stage 8's hard stretch used a direction variable plus a reverseTimer. What pattern do you notice about state variables across these stages?
Test your stage
- Pressing Green, Red, Blue in order destroys PuzzleWall_Back; you can walk through to the celebration room.
- Pressing any wrong button (e.g., Red first) resets the sequence — the puzzle is back to expecting Green.
- Output prints the sequence state correctly (correct/expected/wrong messages).
- Optional: if you added
CorrectSoundandWrongSound, the ding and buzz sounds play on correct and wrong presses. - Touching the final yellow Marble pad respawns you there forever.
- Design check. Enter the room without studying the clue. Can you solve it in under 4 tries? If not, make the clue clearer.
- Final check. Walk the whole obby from Stage 1 to the celebration room. Every checkpoint, hazard, and script should work.
If it breaks
- Clicking does nothing. The ClickDetector is missing. Expand the button in Explorer and add one if needed.
- The wall doesn't destroy after I press all three in order. Check Output. If you see "Correct! Next expected: nil" on the third press but no SOLVED message, the win-condition check (
currentIndex > #correctOrder) might be miscounted. Print#correctOrderto confirm it's 3. - The sounds don't play. Sound effects are optional. If you added them, the SoundId might be invalid, or the Sound objects might not be inside the wall. Click each Sound and check Properties → SoundId. Or test the sounds individually in Explorer (right-click → Play).
attempt to index nil with 'MouseClick'. A ClickDetector is missing on one of the buttons. Re-check Step 5.- Pressing a button correctly the FIRST time but the SECOND time doesn't increment. Check Output for the printed
currentIndexvalues. If it stays stuck at 2 forever, the comparison logic has a bug — printexpectedandbuttonNameto see why they don't match. - The wall destroys but I can't walk through where it was. PuzzleFloor probably doesn't extend past the wall. Extend the floor (or CelebrationFloor) so there's a walkable surface where the wall used to be.
This is the capstone — budget 60 minutes minimum. The script is the most complex one in the course, but it's just a careful composition of patterns campers have used in earlier stages (Touched handlers → ClickDetectors, state variables → currentIndex, tables → correctOrder). Frame it that way and the script gets less intimidating.
- The 1-indexed table is the biggest mental hurdle for campers who've programmed in other languages. Lua starts arrays at 1, not 0.
correctOrder[1]is Green. There is nocorrectOrder[0]. - The button wiring at the bottom is dense. Walk through one connection at a time: click event, anonymous function, then
handleButton("Green"). - Some campers will try to make the puzzle longer (4 or 5 buttons). Encourage it — but the longer the sequence, the more important the clue. Always test that a brand-new player can solve it in under 4 tries.
- After Stage 10 works end-to-end, have campers walk the FULL obby from Stage 1 to celebration room without restart. The whole course playthrough is the real test. Many small bugs only show up during the full walk.