Python Machine Learning
Python camp course · Ages 10-13
Train an Image Classifier
Campers train an image classifier in Python, test it on new data, and build a prediction demo they can explain.
What campers ship
A trained image classifier with proof
Every stage adds one piece of the same machine-learning workflow. By the end, campers can show how their model learned, how accurate it is, and where it still makes mistakes.
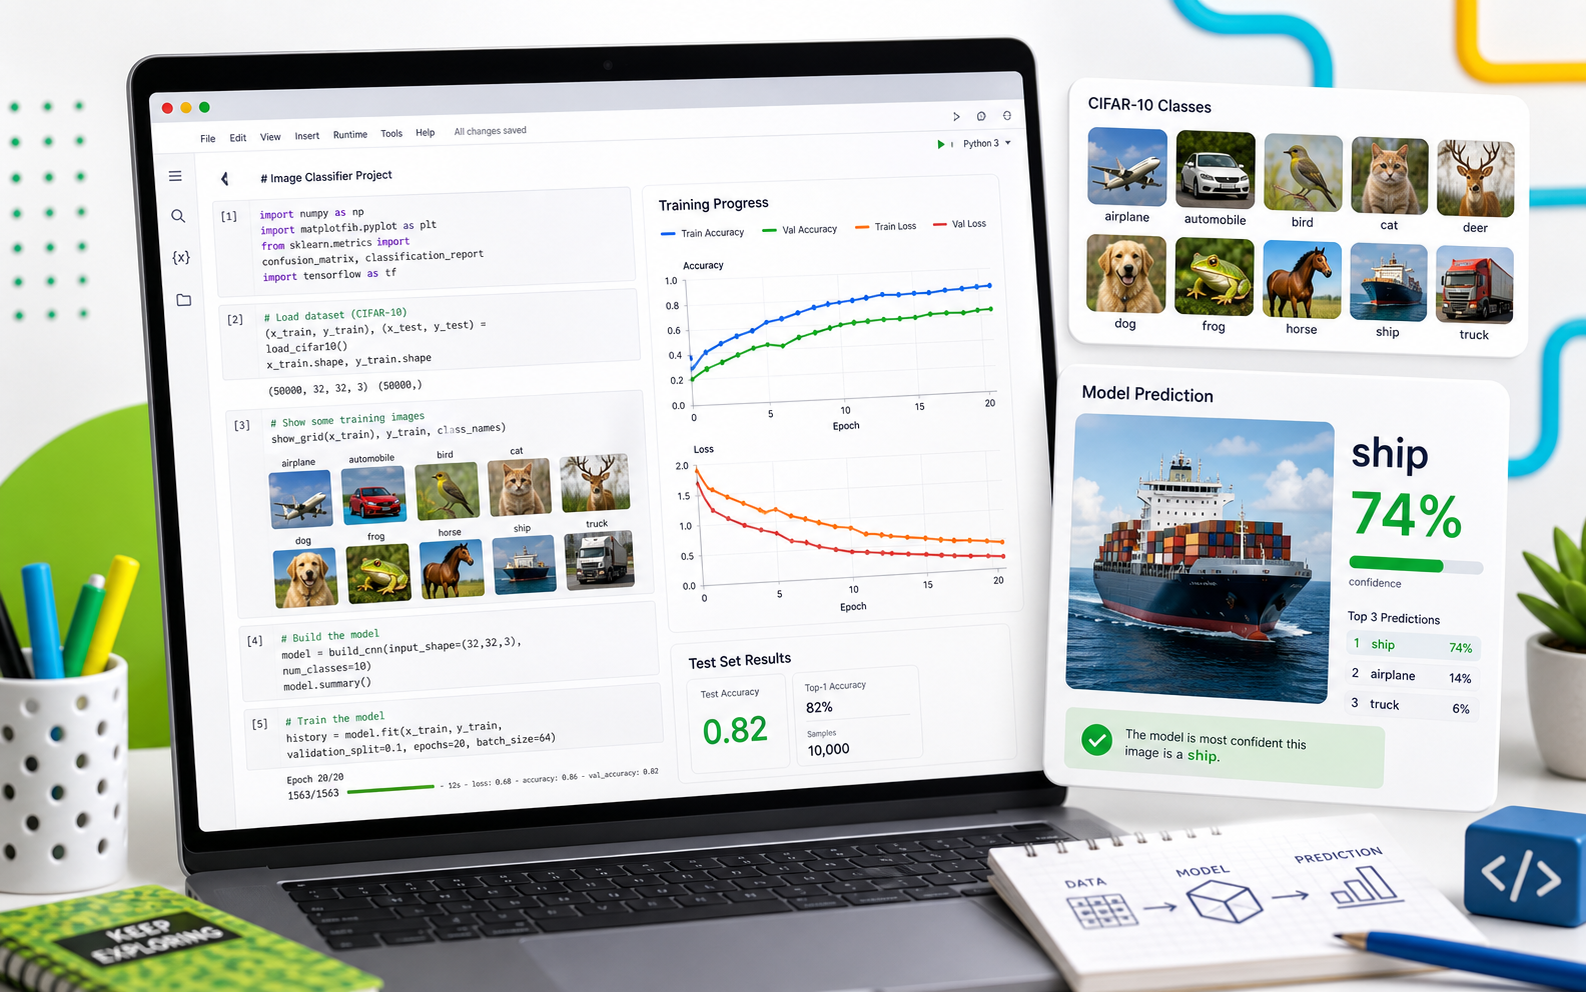
A Python notebook that trains on real image data
Accuracy and loss charts that show learning
A final demo with predictions and confidence
Project moments
Every result comes with evidence
Students inspect data, train the model, test it, and present results. Each checkpoint should create visible evidence they can explain.
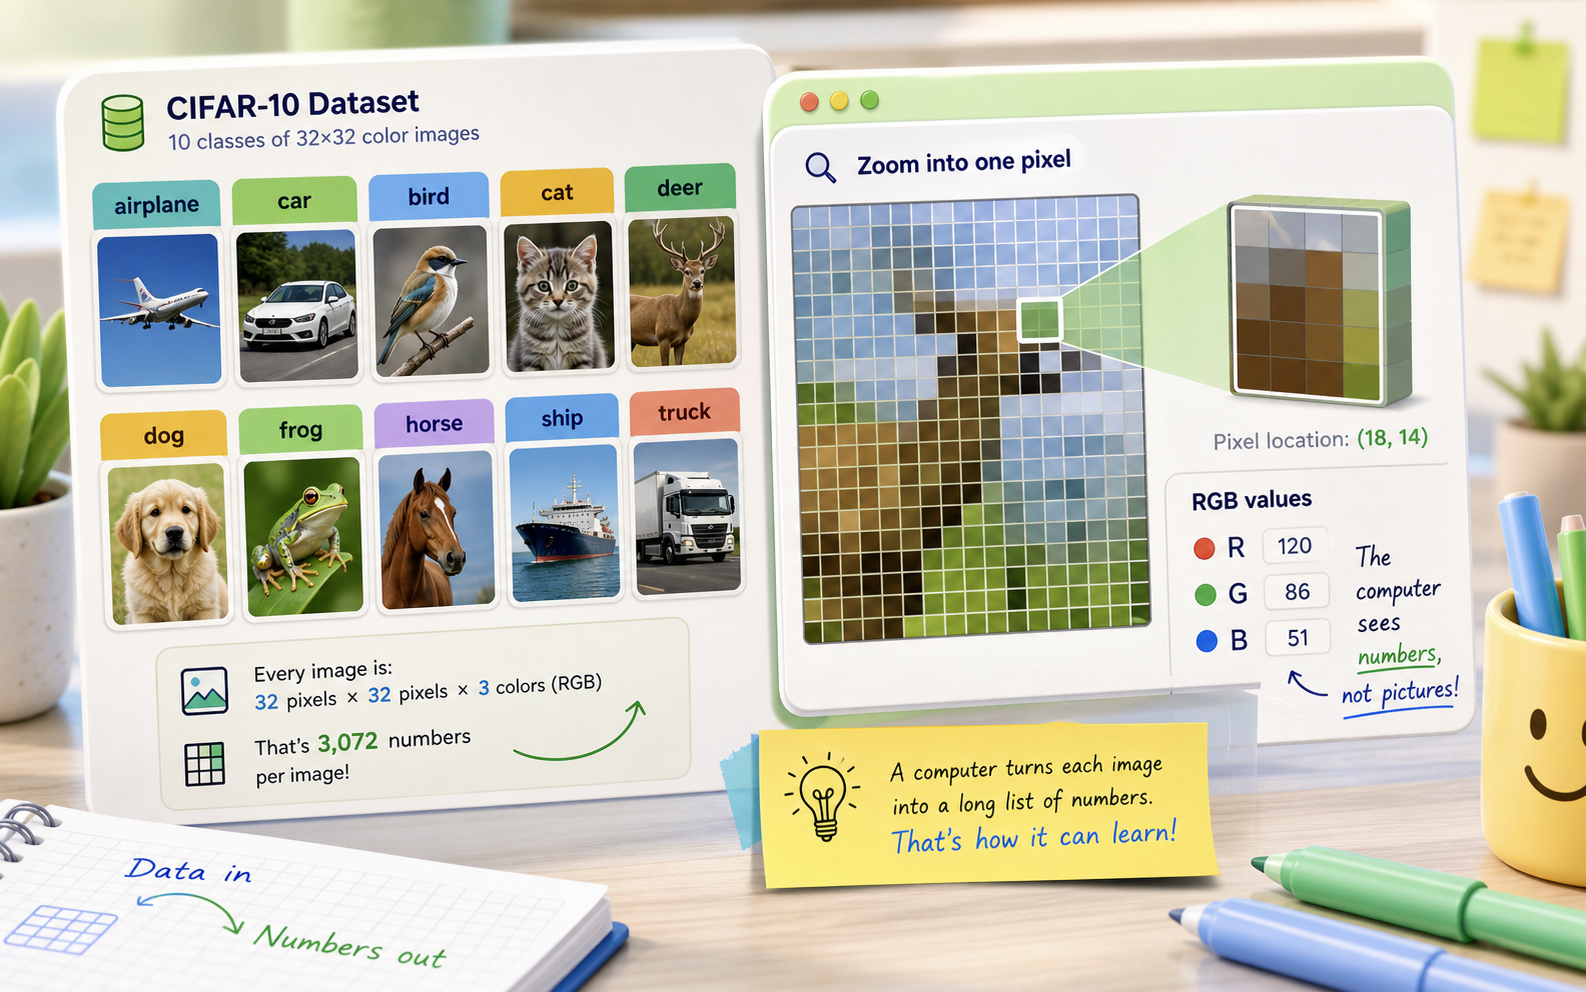
Images become numbers
The course starts by showing that every picture is a 32x32 grid of RGB values. Shapes and labels make the dataset concrete before any model is built.
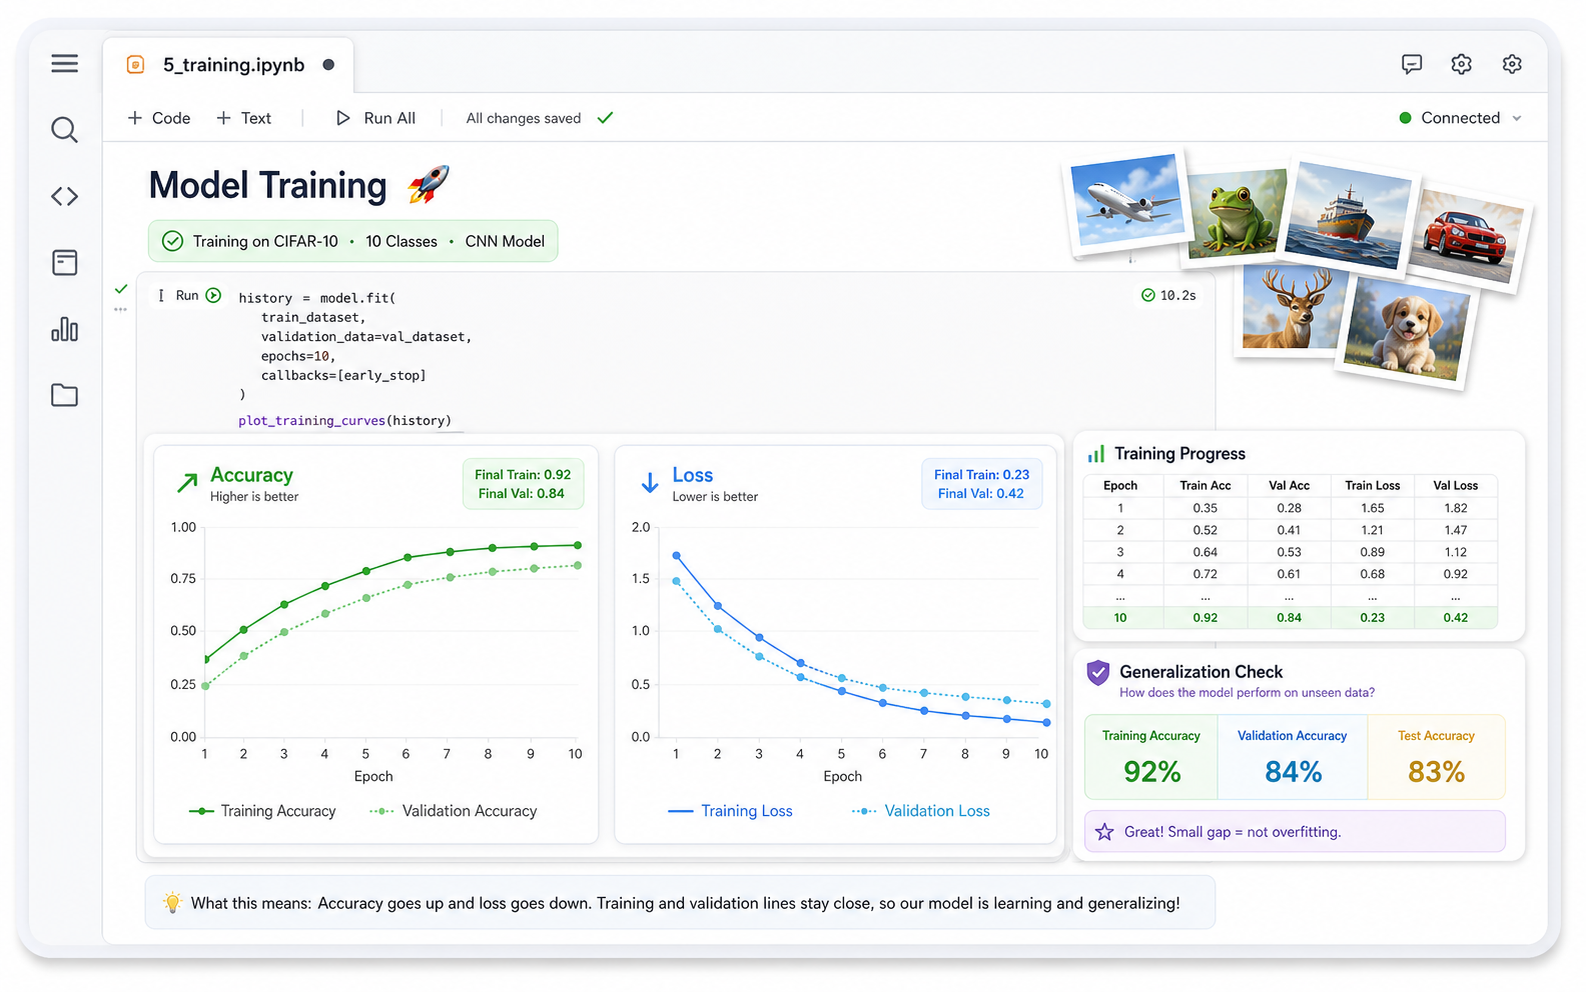
Training becomes a chart
Students watch accuracy rise and loss fall over epochs, then compare training and validation lines instead of trusting one score.
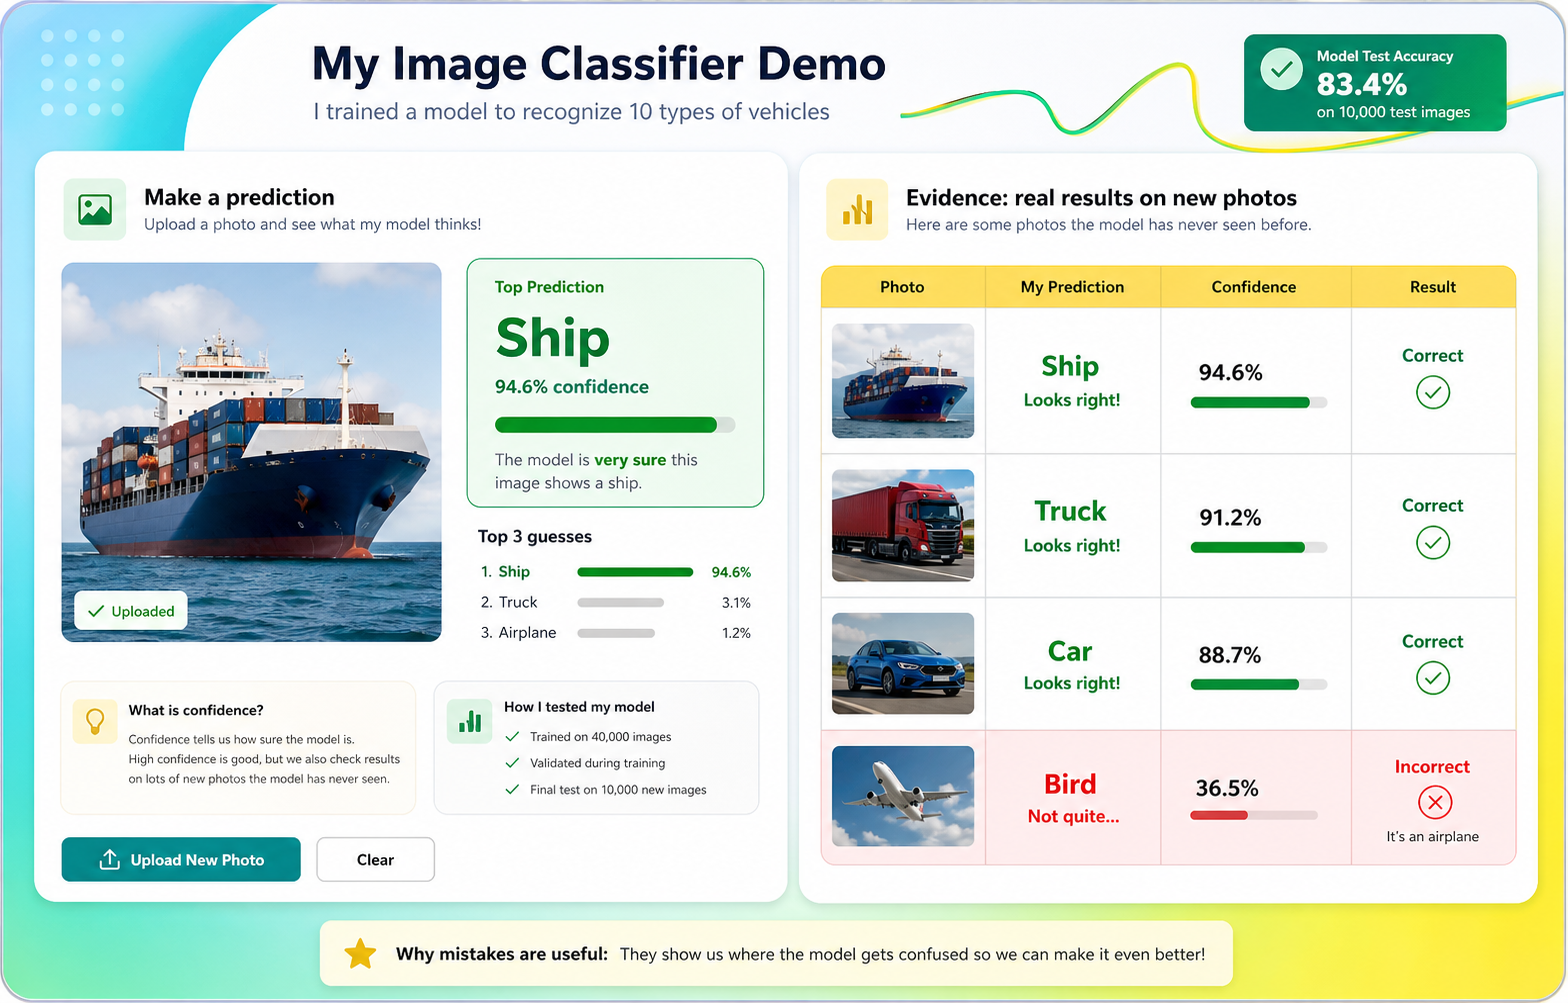
Predictions need evidence
The final demo shows a photo, the predicted label, confidence, and a short explanation of correct and incorrect results.
A notebook tells the whole story
Data loading, model design, training curves, test accuracy, augmentation, and predictions all live in one Colab notebook students can walk through.
Course path
Your model grows stage by stage
Each stage adds one machine-learning idea and one visible notebook result.
How Computers See Pictures
Load CIFAR-10, inspect image shapes, pixels, and labeled photos.
Build a class samplerStage 2Data Detective
Count classes, inspect samples, and predict which images will be hard.
Find an ambiguous exampleStage 3Prepare Data Like an Engineer
Normalize pixels, encode labels, and split validation data with before/after proof.
Check validation balanceStage 4Build a CNN One Block at a Time
Create convolution, pooling, and decision layers while reading model summaries.
Find the largest layerStage 5Train and Read the Learning Signals
Train a baseline model and interpret accuracy, loss, and validation curves.
Find the best epochStage 6Grade It Honestly
Evaluate on the sealed test set and measure the train-test gap.
Make a score tableStage 7Find What It Gets Wrong
Inspect wrong predictions and calculate per-class accuracy.
Build a confusion gridStage 8Improve the Experiment
Train a comparable augmented model and compare it to the baseline.
Compare gapsStage 9Use It on New Images
Upload images, preprocess them, and read top-3 predictions with confidence.
Add a not-sure ruleStage 10Present an Honest AI Demo
Build a results table and present successes, mistakes, and limitations.
Add top-3 to the tableFor camp flow
Protect the evidence checks
The course works best when students pause to inspect shapes, charts, test scores, and wrong predictions. Those checks are what separate machine learning from just running notebook cells.
What you're building
You're going to build an image classifier — an AI that looks at a picture and names what it sees. By the end of the week, you'll feed your AI a photo it has never seen and it will guess: airplane, cat, dog, truck…
You won't download a finished AI. You'll build one yourself, in Python, and train it on real graphics hardware in Google Colab. You'll watch it get smarter across each round of practice, find out where it's still wrong, and then make it better.
An image classifier is a program that sorts pictures into groups. A model is the part that does the learning — it starts knowing nothing, and we train it on thousands of labeled examples until it can recognize patterns on its own.
Your two tools
The whole course uses two tools, and you keep both open:
- Google Colab — a free coding notebook in your browser. This is where you write Python and train your AI. Colab runs on Google's GPUs, so training that would take your laptop an hour finishes in a couple of minutes.
- Machine Learning for Kids — a no-code site we use once, on Day 1, to feel the whole train → test loop before we write any Python.
You never install anything. Everything runs in browser tabs.
How the tools and steps connect
The warm-up shows the idea with no code. The main course builds the same workflow in Python, one notebook section at a time.
- 1Photos / CIFAR-10labeled image examplesStage 1
- 2Notebook variablesx_train, y_train, class_namesSetup-2
- 3Prepared datanormalized pixels and fair pilesStage 3
- 4Keras modelCNN layers and summaryStage 4
- 5Training historyepochs, loss, accuracyStage 5
- 6Test evidencesealed score and mistakesStages 6-7
- 7Improved modelaugmentation comparisonStage 8
- 8Inferenceuploaded image to top-3 guessesStage 9
- 9Demo evidencetable, confidence, limitationStage 10
Machine Learning for Kids gives you the no-code preview. Google Colab is where the full Python workflow happens: data becomes arrays, arrays train a Keras model, scores prove quality, and predictions become demo evidence.
Warm-up: train an AI with zero code
Before we touch Python, let's train an AI the easy way so the big idea is already in your head.
Open Machine Learning for Kids. Click Get started, then Try it now (you don't need an account today).
- Make a project. Add a new project named
Cat or Not. Project type: Images. Storage: in your web browser. - Add two labels. Open the project and click Train. Make a label called
Catand a label calledNot Cat. Your coach will share two folders of pictures — drop the cat photos underCatand everything else underNot Cat. - Train it. Click Learn & Test, then Train new machine learning model. The site practices on your labeled pictures.
- Test it. Paste an image link and see what your model guesses. Try these:
That's the entire loop you'll build in Python this week: gather labeled examples → train a model → test it on new pictures. The only difference is that you'll write every step yourself.
The week at a glance
This is a 5-day camp. Each day builds on the one before.
| Day | What you do |
|---|---|
| Day 1 | Intro + warm-up, set up Colab, inspect images, and read the dataset (Setup, Stage 1, Stage 2) |
| Day 2 | Prepare the data, build your CNN, and train the baseline model (Stage 3, Stage 4, Stage 5) |
| Day 3 | Grade it honestly and study what it gets wrong (Stage 6, Stage 7) |
| Day 4 | Improve the experiment and test new images (Stage 8, Stage 9) |
| Day 5 | Build the evidence table, rehearse the demo, and showcase (Stage 10) |
What you'll learn
- How a computer sees a picture as a grid of numbers (pixels and color).
- How to get raw data ready for a model (normalizing, labeling, splitting).
- What a Convolutional Neural Network is and how to build one in Keras.
- What it means to train a model — epochs, loss, and accuracy.
- Why a model can look great in practice but fail on new pictures (overfitting), and how to fix it.
- How to feed your trained AI a brand-new photo and read its prediction.
- How to present an AI result honestly with evidence, mistakes, confidence, and limitations.
Ready? Head to Setup to open Colab.