Stage 9: Edit in iMovie
Make sure you've finished Stage 8: Publish & Playtest Party and have a few short clips saved.
an edited gameplay video with a chosen YouTube-style recipe, title, sound, and thumbnail
how to trim clips, arrange a timeline, add text and sound, and export a finished video
a finished gameplay video, ready to post
These are the Studio-stage tools. Open in a new tab so the course stays open in this one. Ask a coach before you sign in to anything.
Preview the iMovie studio: learn the buttons, make a tiny practice edit, choose a fun YouTube-style recipe, and export your gameplay video.
Build this stage belowThe big idea
Raw clips are the ingredients. Editing is how you turn them into a video people want to watch.
Today you will use iMovie on your Mac. You do not need to know iMovie already. First you will learn the editor with one tiny practice clip. Then you will choose one recipe: a step-by-step plan for the kind of Roblox video you want to make.
A YouTube gameplay video usually starts with something exciting fast: a win, a fail, a chase, a big reaction, or a challenge question. Then the editor cuts out the slow parts, adds a few words on screen, uses sound to make the moment pop, and exports the finished video.
Before students edit on their own, build a 20-second example on the projector:
- Open iMovie, create a new movie, and import two clips.
- Point to the media panel, viewer, timeline, and playhead.
- Drag one clip to the timeline.
- Trim the start and end by dragging the clip edges inward.
- Press Command+Z once so students see that mistakes are fixable.
- Add one title, one sound effect, and export a short file. Narrate every click. Do not skip the vocabulary.
Build it
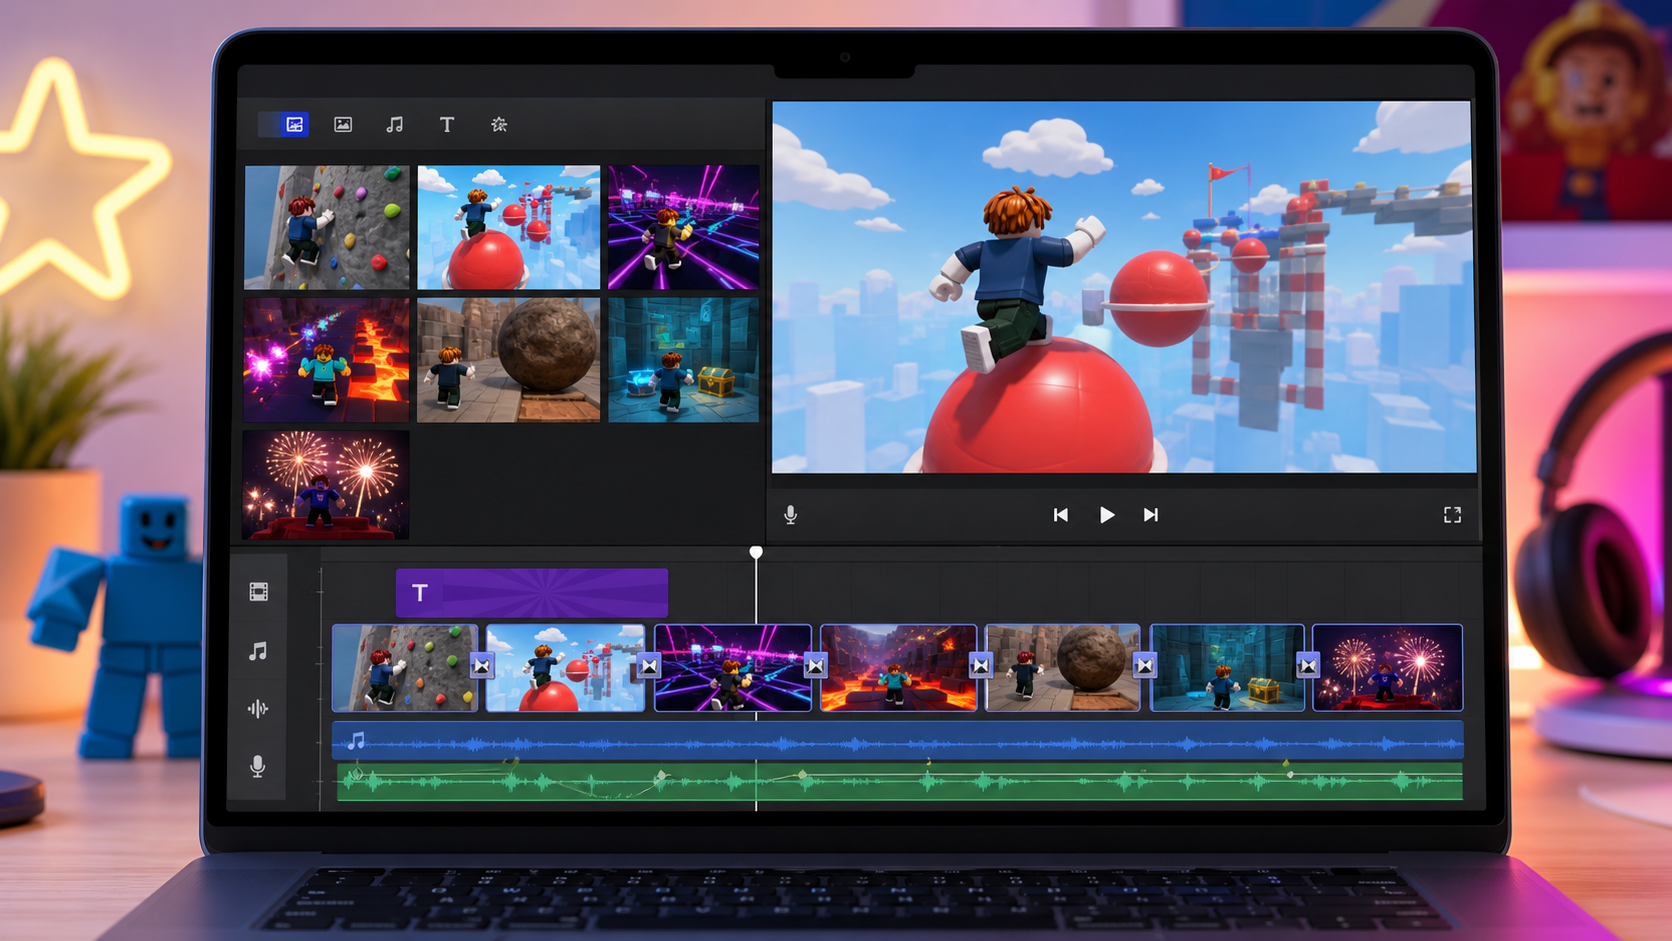
Step 1 - Meet the iMovie screen
Open iMovie from Applications, Launchpad, or Spotlight search. Click Create New -> Movie.
Before you click around, learn the parts of the screen:
- Media panel: the top-left area where your saved clips appear.
- Viewer: the big preview screen where you watch your video.
- Timeline: the long strip at the bottom where your finished video is built.
- Clip: one recording, like one Roblox fail or one fireworks moment.
- Playhead: the thin vertical line that shows the exact moment you are watching.
- Trim: making a clip shorter by dragging away the boring start or boring end.
- Title: big text like the name of your video.
- Caption: short text that explains or reacts to a moment, like "SO CLOSE!"
- Audio: music, sound effects, game sound, or voice.
- Export: saving the finished iMovie project as a video file.
If something disappears or looks wrong, press Command+Z. That means "undo the last thing." You can undo most editing mistakes.
Step 2 - Import your clips
- Click Import Media.
- Find your Roblox YouTuber Clips folder.
- Click one clip, then hold Command and click more clips if you want to import several.
- Click Import Selected.
- Wait until your clips appear in the media panel.
If you do not know which clip is best yet, that is okay. Import the clips first. You will choose after you watch them.
Step 3 - Do the tiny practice edit
Do this before choosing a recipe. It teaches your hands what editing feels like.
- In the media panel, click one short clip.
- Drag it down to the timeline at the bottom.
- Press the Space bar to play. Press Space bar again to pause.
- Click the clip in the timeline. A yellow outline appears around it.
- Move your pointer to the left edge of the clip until the pointer changes.
- Drag the left edge inward a little. This cuts off the beginning.
- Move your pointer to the right edge of the clip.
- Drag the right edge inward a little. This cuts off the ending.
- Press Space bar and watch the shorter clip.
- If you cut too much, drag the edge back out or press Command+Z.
You just trimmed. Trimming does not delete your real recording. It only tells iMovie which part to use in this project.
Pause the room here. Every student should be able to show one clip in the timeline, play it, trim an edge, and undo. Do not move into recipes until this works.
Step 4 - Make your real timeline
- Delete the practice clip if you do not want it: click it in the timeline and press Delete.
- Watch your clips in the media panel.
- Pick your best moment first: a jump, fail, chase, laugh, fireworks burst, or big reaction.
- Drag that clip to the start of the timeline.
- Drag 3-8 more clips after it.
- Keep the video short: aim for 45-90 seconds if you are new, or 60-120 seconds if you move fast.
The first clip is the hook. A hook is the moment that makes someone want to keep watching. Do not start with quiet walking unless something funny or scary is about to happen.
Step 5 - Choose one YouTube-style recipe
Pick one recipe. Do not try to do all of them.
Use this quick picker:
- Best clips are wins, saves, and near-misses? Pick Hype Highlight Reel.
- Best clips are falls, squishes, and surprises? Pick Funny Fail Replay.
- Your video asks, "Can they beat it?" Pick Challenge Run.
- Your obby looks dramatic and you want people to play it? Pick Trailer Teaser.
- Your voice or reactions are the best part? Pick Commentary Episode.
Recipe A - Hype Highlight Reel
What this makes: A fast, exciting video of your best Roblox moments.
Pick this if your clips have: clean jumps, close saves, wins, fireworks, or "Did you see that?!" moments.
- Drag your biggest moment to the very start of the timeline.
- Trim the start of that clip: drag the left edge inward until the action is about to happen.
- Trim the end: drag the right edge inward until right after the reaction.
- Add 3-6 more exciting clips after it.
- Trim each clip the same way: start right before the action, end right after the reaction.
- Click Titles at the top. Pick a simple title.
- Drag the title above the first clip or onto the start of the timeline.
- Type a short title like "BEST OBBY RUN!" or "CAN YOU BEAT THIS?"
- Add 2-4 short captions on the biggest moments: "CLEAN!", "SO CLOSE!", "FINAL JUMP!"
- Click Audio. Drag one upbeat music track or sound effect under the clips.
- Click the audio track and lower the volume if it is louder than the game or voice.
- End with your fireworks, trophy, finish room, or best celebration clip.
Tiny version: Use 4 clips, 1 title, 2 captions, and 1 sound.
Pepper challenge: Make one jump or fireworks burst land on the beat of the music. If the beat hits too early or too late, drag the clip a tiny bit left or right.
Recipe B - Funny Fail Replay
What this makes: A silly fail compilation where the obby is the joke.
Pick this if your clips have: falls, missed jumps, boulder hits, KillWall chases, or surprise hazards.
- Click Titles and make a short opening title: "MY OBBY FAILS" or "TRY NOT TO FALL!"
- Drag your funniest fail right after the title.
- Trim the fail so it has three parts: the player tries, the mistake happens, the player reacts or resets.
- Drag 3-6 more fail clips after it.
- Trim each fail so the mistake happens quickly.
- Add a short caption to the funniest fails only: "NOPE!", "OUCH!", "SO CLOSE!"
- Click Audio and add one quick sound effect under the biggest fail.
- Keep sound effects short. If every fail has a loud sound, the video gets messy.
- End with one success clip, fireworks clip, or happy reset so the video feels good.
Tiny version: Use 3 fails, 1 title, 2 captions, and 1 sound effect.
Pepper challenge: Make a replay. Click a short fail clip, press Command+C, click after it, press Command+V, and trim the copied clip even shorter. Add a caption like "REPLAY!"
Kindness check: Do not embarrass a friend. The funny part is the game moment, not the person.
Recipe C - Challenge Run
What this makes: A story video where one player tries to beat a goal.
Pick this if your video has: one friend playing your whole obby, one hard stage, or one clear question.
- Click Titles and make the question clear: "CAN MAYA BEAT MY OBBY?" or "ONE TRY CHALLENGE!"
- Drag the first challenge clip after the title.
- Put clips mostly in game order: beginning, middle, hardest stage, finish.
- Trim quiet walking, but keep enough before each obstacle so viewers understand the challenge.
- Add simple progress captions: "STAGE 2", "HARD PART", "FINAL PUZZLE", "FINISH!"
- If a clip is slow and does not help the challenge, delete it from the timeline.
- Add music quietly. The game sounds and reactions should still be easy to hear.
- Add a final title card with the result: "CLEARED!" or "TRY AGAIN NEXT TIME!"
Tiny version: Show only start, hard part, and finish.
Pepper challenge: Add a scoreboard feeling with captions like "FAILS: 1", "FAILS: 2", or "FINAL TRY!"
Recipe D - Trailer Teaser
What this makes: A mini movie preview that makes people want to play your obby.
Pick this if your clips have: a scary hazard, a cool camera angle, a dramatic puzzle, fireworks, or a strong theme.
- Pick 2-3 very short teaser clips. Good teasers are the KillWall moving, boulder rolling, hidden hazard surprise, or fireworks bursting.
- Drag the teasers to the start of the timeline.
- Trim each teaser short. A trailer teaser can be only 1-3 seconds.
- Click Titles and add your game name after the teaser clips, not before them.
- Add dramatic or exciting music quietly under the whole trailer.
- Use only 1-3 captions. Try words like "CAN YOU ESCAPE?", "FINAL ROOM", or "PLAY IF YOU DARE!"
- End before viewers see everything. A trailer should make them curious.
Tiny version: Use 3 teaser clips, 1 title, and 1 music track.
Pepper challenge: Add one simple transition only when the video changes from teaser to title. A fade is enough.
Recipe E - Commentary Episode
What this makes: A gameplay video that feels like you are hosting a show.
Pick this if your clips have: your voice, a friend's reaction, funny talking, or a big "no way!" moment.
- Find the clip where the voice is clearest or funniest.
- Drag that clip to the start of the timeline.
- Trim the start so the voice or action begins quickly.
- Trim out long silence. If nobody is talking and nothing is happening, shorten it.
- Add 2-5 gameplay clips after the voice clip.
- If you add music, click the music track and lower the volume so the voice is easiest to hear.
- Add captions only for the best line or reaction: "NO WAY!", "I MADE IT!", or "WATCH THIS!"
- End with a quick outro title or voice line: "That was my obby. What should I build next?"
Tiny version: Use 1 voice clip, 2 gameplay clips, 1 caption, and no music.
Pepper challenge: Make a cold open. Start with the funniest reaction first, then add a title card after it.
Step 6 - Add text that helps the recipe
Text is powerful when it is short.
To add a title or caption:
- Click Titles at the top of iMovie.
- Pick a simple title style.
- Drag it above a clip or to the start of the timeline.
- Click the text in the viewer.
- Type only a few words.
- Play that part back. If the words cover the player or hazard, move the title or choose a simpler one.
Good gameplay captions are short: "NOPE!", "SO CLOSE!", "FINAL JUMP!", "CAN THEY WIN?"
Step 7 - Add sound without making a mess
Sound should make the moment more fun, not louder for no reason.
You cannot grab any song from the internet. Popular songs from Spotify, Apple Music, TikTok, or random YouTube videos can cause copyright problems when your video is uploaded. Use music your coach approves.
Good music sources for this course:
- Coach music folder: best for camp. Your coach may give you a folder with 5-10 approved tracks, like hype, silly, dramatic, chill, and victory.
- iMovie sound effects: best for quick moments. In iMovie, click Audio -> Sound Effects, then drag a sound under your clip.
- YouTube Audio Library: best for older students or coach demos. In YouTube Studio -> Audio Library, download a track or sound effect. If the track says it needs credit, copy the credit text into the YouTube description in Stage 10.
Avoid these unless a coach says yes:
- Popular songs from streaming apps.
- Random "no copyright music" videos.
- Music from another YouTuber's video.
- Game music from outside your own recording.
To put music into iMovie:
- Choose an approved music file or sound effect.
- Drag the audio file into iMovie, under the video clips in the timeline.
- Click the audio track.
- Lower the volume if it covers the game sound or voice.
- Use sound effects on the biggest moments only: a jump, a fail, a win, fireworks, or a surprise.
Music changes the whole feeling of the same clip. A fast track makes a clean jump feel hype. A silly sound makes a fail feel funny. Quiet music makes commentary easier to hear. Pick the feeling you want first, then choose the sound.
Recipe sound guide:
- Hype Highlight Reel: upbeat music, a few big hit sounds.
- Funny Fail Replay: silly short sounds, not too many.
- Challenge Run: quieter music so the story is clear.
- Trailer Teaser: dramatic music, fewer captions.
- Commentary Episode: voice first, music very low or none.
Step 8 - Watch-back fix pass
Before exporting, watch your whole video once.
Fix these if you see them:
- The first 3 seconds are slow: drag your best clip to the front or trim more.
- A clip feels boring: trim it shorter or delete it.
- Text stays too long: shorten the title clip in the timeline.
- Music is too loud: click the audio and lower the volume.
- The recipe feels mixed up: remove captions, sounds, or clips that do not match your recipe.
Step 9 - Export your video
Export means saving the iMovie project as a normal video file.
- Click the Share button in the top-right corner.
- Click Export File.
- Choose 1080p if it is available.
- Name the file with your game name.
- Save it to your Roblox YouTuber Clips folder.
- Open the exported
.mp4and play it once to make sure it works.
Step 10 - Design a thumbnail
The thumbnail is the picture people click before they watch. You are making a separate image file for your coach, not another video.
Part A - Pick the picture
- Open your exported
.mp4. - Play until you see an exciting moment.
- Pause when the picture shows the action clearly.
- Ask yourself: "Can someone understand this in one second?"
- If the answer is no, keep playing and pause on a clearer moment.
Good thumbnail moments usually show:
- your avatar in the middle of a big jump
- a funny fall right before or after it happens
- a scary hazard close to the player
- fireworks, a trophy, or the finish line
- the hardest obstacle in your obby
Part B - Take the screenshot
- Keep the video paused on your best frame.
- Press Shift + Command + 4.
- Your mouse turns into a little cross.
- Drag a box around only the video picture, not the whole screen.
- Let go of the mouse or trackpad.
- Look on the Desktop for a new screenshot file. If you do not see it, open Finder and click Recents.
Part C - Build it in Keynote
Use Keynote first. Pages or another coach-approved image tool is only a backup.
- Open Keynote.
- Click New Presentation.
- Choose a simple white or basic theme.
- Drag your screenshot onto the slide.
- Make the screenshot big enough to fill the whole slide.
- Click Text to add words.
- Type only 2-4 words.
- Make the words huge and easy to read.
- Move the words to an empty corner or side. Do not cover the jump, fall, hazard, or finish line.
- If the words are hard to see, add a bright rectangle behind them or change the text color.
Pick words that match your recipe:
- Hype Highlight Reel: "BEST RUN!" or "TOO FAST!"
- Funny Fail Replay: "I FELL!" or "SO MANY FAILS!"
- Challenge Run: "CAN THEY WIN?" or "HARDEST JUMP!"
- Trailer Teaser: "PLAY IF YOU DARE!" or "OBBY TRAILER!"
- Commentary Episode: "WATCH THIS!" or "MY BIG REACTION!"
Part D - Export the thumbnail image
Do not hand your coach the Keynote file. Your coach needs a picture file.
- In Keynote, click File.
- Click Export To.
- Click Images.
- Choose PNG or JPEG.
- Name it
thumbnail-your-game-name. - Save it in your Roblox YouTuber Clips folder.
- Open the saved thumbnail image once.
- Squint at it. If you cannot read the words while squinting, go back to Keynote and make the words bigger.
- Give your coach the exported
.mp4and the thumbnail.pngor.jpg.
Watch your video like a stranger scrolling. In the first 3 seconds, is something happening? If the answer is no, trim more or start with a better moment.
Understand it
Editing is choosing. You are choosing the best parts and leaving out the slow parts. That is why trimming matters.
A hook goes first. The first few seconds should show a reason to keep watching: a fail, win, chase, question, or reaction.
A recipe keeps the video focused. Without a recipe, it is easy to add random sounds, random captions, and random clips. With a recipe, every choice has a job.
Captions are for big moments. If everything has a caption, nothing feels special. Use captions like stickers on the moments that deserve them.
Sound carries emotion. Music tells the viewer how the video should feel. Sound effects make one moment pop.
The thumbnail is the poster. More people see the thumbnail than the video. Big readable text and one clear idea work best.
Try this
Try this
Three short experiments. Predict before you run, then test your guess.
Before you trim, guess how long your finished video will be. After editing, check the exported file. Did your video get shorter than the clips you started with?
Pick one clip and imagine it in two recipes. Would you edit a fail clip differently for Funny Fail Replay than for Trailer Teaser?
Your recipe, title, thumbnail, and first 3 seconds should all promise the same kind of video. Look at them together. Do they match?
Test your stage
Before moving on:
- You completed the tiny practice edit.
- You know how to trim a clip edge and undo with Command+Z.
- You chose one recipe: Hype Highlight Reel, Funny Fail Replay, Challenge Run, Trailer Teaser, or Commentary Episode.
- Your best moment or strongest question is near the start.
- Your clips are trimmed so slow parts are shorter or gone.
- Your title and captions are short and match the recipe.
- Your music or sound effects come from an approved source.
- Your music or sound effects support the video without covering voice or gameplay.
- You exported an
.mp4and played it back. - You made a thumbnail with big, readable text.
- Creator check. Does the first 3 seconds make you want to keep watching?
If it breaks
- iMovie won't import my clip. Check the Roblox YouTuber Clips folder and make sure the file is a video. If the recording saved somewhere else, search Finder for today's date or drag the clip into the folder first.
- I do not know what to click. Go back to Step 1 and find the media panel, viewer, timeline, and playhead. Then redo the tiny practice edit.
- My clip disappeared. Press Command+Z. If that does not fix it, drag the original clip from the media panel back to the timeline.
- My trim cut the wrong part. Drag the clip edge back out, or press Command+Z. Trimming in iMovie is fixable.
- I do not know what to cut. Cut the part before the action starts, the part after the reaction ends, and any quiet walking that does not help your recipe.
- My video feels boring. Put the best moment first, make clips shorter, and delete any clip that does not match your recipe.
- My captions cover the action. Use fewer words, make them shorter, or choose a simpler title style.
- I want to use my favorite song. Ask a coach first. Popular songs from streaming apps or random videos can cause copyright problems when you upload.
- The music is louder than the game or voice. Click the music track and lower the volume.
- My edit feels messy. You may be mixing too many styles. Pick one recipe and remove sounds, captions, or clips that do not help it.
- Export is taking forever. Shorter videos export faster. Check that your video is around 45-120 seconds, then try again.
- I cannot find my screenshot. Check the Desktop first. If it is not there, open Finder and click Recents. You can always take the screenshot again.
- My thumbnail text is hard to read. Use fewer words, make them bigger, change the color, or put a solid rectangle behind the words.
- My words cover the best action. Move the words to an empty corner or side. The player, hazard, finish line, or funny fall should stay visible.
- I saved a Keynote file, not a picture. Open Keynote again and use File -> Export To -> Images. Your coach needs a
.pngor.jpg. - YouTube will not accept the thumbnail. Custom thumbnails sometimes need special channel settings. Your coach can use a strong video frame, but your thumbnail still helps you practice creator design.
Editing is where 7-10 year-olds get the most stuck and the most delighted. A few pointers:
- Teach the screen first. The vocabulary matters: media panel, viewer, timeline, playhead, trim, title, audio, export.
- Require the tiny practice edit. Every student should trim one clip and undo before choosing a recipe.
- Demo one recipe live. Hype Highlight Reel is the safest room-wide demo; Funny Fail Replay is the easiest backup if the room captured more mistakes than wins.
- Make every camper pick one recipe. Ask, "Does that clip, sound, or caption help your recipe?"
- Expect "my whole clip is gone!" panic. Show Command+Z early and often.
- Cap the length. New editors should aim for 45-90 seconds. Faster editors can go to 120 seconds.
- Require export before thumbnail polish. Save the thumbnail for students who finish early.
- Push older/faster students toward pepper challenges only after their first export works.
- Prep one shared, coach-approved music folder so students choose from safe tracks instead of searching the internet during class.